Showing posts with label millinery. Show all posts

Friday, October 26, 2012

Victorian Sunbonnet Tutorial ~ Pt. 4

Now that your brim and crown are complete, it is time to attach the curtain! This large piece shades the back of your neck and also helps protect the upper back of your dress from excessive fading when in the sun. First, press under and stitch a narrow hem all around the curved short edges and one long edge of the curtain. 


The next step is to run gathering stitches along the top, straight edge of the curtain. Pull up the threads to fit the neckline and stitch, right sides together, with bottom brim/crown:
I centered the gathering stitches on the curtain to fit the neck edge of the crown. You can do the same or gather the curtain to the bonnet brim/crown evenly all the way across. Either way is fine!
To finish off the inside seam between the curtain and the rest of the bonnet, I like to sew a strip of fabric over the seam.
 I stitch the strip to the bottom of the seam allowance, flip it up to encase the seam allowance and then turn under a tiny edge along the top of the strip. I stitch that to the brim/crown and that finishes the seam nicely. You can finish the seam between the brim and crown by binding it or overcasting, if needed. Since my fabric is not very ravelly I chose to not finish the seam at this time. Later if I find threads are coming loose I will go back and overcast the seam by hand.

The bonnet is very close to being done! The only thing left to do is to add ties.


Love,
Sarah

Thursday, October 25, 2012

Victorian Sunbonnet Tutorial ~ Part 3

Time to sew the brim to the crown!

Run gathering stitches along the curved edge of the crown piece and draw them up to fit the long edge of the brim:

Pin to brim, right sides together and stitch.

Run gathering stitches along the straight bottom edge of the crown piece. Draw them up to fit your neckline. (this is best done by putting the bonnet-so-far on and drawing the neckline edge of the crown up to fit your neck - be sure to take into account the hairstyle you will be utilizing while wearing the bonnet!) For me, this measurement is approximately 7 inches.

If desired, pipe the lower edge of the crown/brim.

The bonnet is now half-complete!

Love,
Sarah


Wednesday, October 24, 2012

Victorian Sunbonnet Tutorial ~ Part Two

Once all your sunbonnet pieces are cut out, it is time to stiffen the brim!

As I mentioned in my last post, you can stiffen your brim with cording, slats or quilting.

Cording is very visually attractive and makes a nicely stiffened brim, once starched. The corded bonnets I have made in the past do, however, have a tendency to collapse in the rain.
One of my early attempts at a fancy corded bonnet. This worked well until the first humid day, then it wilted. The brim could have benefited from double or even triple the amount of cording. (the more cord you use, the more starch it can absorb!)

Slat bonnets hold up well in all weather but they cannot be folded back so you are left feeling like you are wearing a mailbox on your head (which is nice when you are doing, say, garden work and only have to look at what is directly in front of you).
Slat bonnets do not work well when one has only two eyes and three small boys upon which to keep those eyes.  Wearing a slat bonnet while being a mother of little ones requires extreme neck exercises during which one must jerk the head back and forth with increasing rapidity in order to know in which (usually three different) directions said small boys are currently running. I will wear a slat bonnet again when I am old and feeble and must walk with a cane. Until then, the slat bonnet has gone to the land of banishment. 
Right now quilting is my personal favorite method of stiffening since it can look as attractive as cording, leaves you with a very stiff brim that does not require starch and can be folded back when you don't need the super-powerful sun protection a large shady brim can give.

I am quilting my brim, so here is the next step once the pieces are cut out.

Unfold your brim piece and insert the rectangle of cotton batting in between the layers of fabric, placing one long edge of the batting along the fold line. Fold the other half of the brim over the batting to cover it, like so:

Now it is time to quilt! There is no right or wrong way to do this. You can quilt by hand or by machine. You can quilt in simple straight lines or do a fancy pattern with zig zags and such. For mine, I chose to quilt in diagonal lines using my presser foot as a spacing guide.

Once the brim was quilted diagonally one way, I went back and quilted it diagonally in the other direction, creating a diamond pattern. For quilted brims, it seems the closer the quilting the stiffer the brim will be.

The finished quilting:

If desired, you can pipe the long raw edge of the brim, which will be sewn to the crown in the next step. This is optional, but I personally like the finished look a piped seam gives. For mid-19th century, go with self fabric piping for the best look.


Love,
Sarah

Tuesday, October 23, 2012

Victorian Sunbonnet Tutorial ~ Part One

So, at last, I have gotten round to that sunbonnet tutorial I promised, oh, 3 months ago or so. The arrival of a certain little lady soon thereafter caused me to fail on that promise but she was oh, so worth it.
Anne shows off her new reproduction quilt, made by the wonderful Janice. Almost four years ago Janice made a similar quilt for Malachi. He still sleeps with it every night!
Now with her 12-pound chubby little self settled into a somewhat predictable routine of sleeping, eating, bathing and playing (i.e. staring, blinking piously and at times gurgling, chortling, snorting or saying "geeewww!" and batting her dimply little hands at various faces that peer over her, or cheeky little toys that dangle by their necks from the activity gym) I have predictable time to work on getting this tutorial out there once and for all.
And here she is showing off her eyelet baby gown, made from a thrift shop curtain.  It  finally fits, just as the weather turns too cool to wear it.
I have divided this tutorial into 5 sections, although the whole bonnet is easily made in a day.
This is the sunbonnet we will be making! The brim on this one is simply quilted with parallel lines of machine stitching that the length of the brim. 

So, for Day 1, here we are!


Day 1: Cutting Out the Sunbonnet

Materials: Approximately 1 yard of fabric, matching or coordinating thread, stiffening agent*.
Janice included a length of this pretty fabric with the baby quilt. It was the perfect choice for a sunbonnet!

Note on materials: There is quite a bit of variation in the materials you can use for a sunbonnet. For a dressier bonnet consider using sheer or semi-sheer fabric in a period style print, or with a woven check, plaid or striped design. For a sturdy "everyday" style sunbonnet, medium weight cotton in a period print, check, plaid or stripe works very well as it can be laundered as needed. But be aware; cottons fade fast with routine wear, especially when worn in the sun. Lightweight wool is another option and has many benefits; it holds its color longer than cottons, it "breathes", it is cool in hot weather and warm in cool weather and does not show wear and tear as soon as cotton may. For a hood suitable for winter wear, choose wool or silk and line the bonnet with silk or polished cotton, extending the width of the brim so you can have a turnback, showing off the lining or facing.

*These instructions are for a quilted bonnet, which uses cotton batting for the stiffening agenst inside the brim. You can, however, easily make a corded bonnet by sewing in multiple rows of narrow cotton cord into the brim (sandwich between the layers of the brim and sew close to the cord) or you can make a slat bonnet by sewing channels into the brim and then inserting thin cardboard slats to stiffen the brim.

Cutting:

Wash, dry and press your fabric.

The first piece to cut is the brim piece. For this, cut a rectangle 20" long x 15" wide. Fold the rectangle in half, wrong sides together and press, so that the rectangle now measures 20" long x 7.5" wide.
Here you can see the brim piece, folded and pressed. The cotton batting is the piece on the bottom.

Cut a piece of cotton batting 20" long x 7.5" wide. Set aside.

Now cut out the crown of the bonnet. Cut a rectangle 12" x 18". Press in half so the rectangle measures 12" long x 9" wide. Round off one corner of the rectangle so that you end up with an upside down "U" shaped piece.

For the bavolet (curtain), cut a strip of fabric measuring 40" long x 12" wide.
Press the bavolet in half so the rectangle measures 20" long x 12" wide. Round off one corner of the rectangle so you have a very wide U shaped piece.

There should be enough scrap left over to cut and make ties once the bonnet is complete. So save those scraps!

To be continued.

Love,
Sarah

Thursday, November 17, 2011

Mid-19th Century Quilted Bonnet

I recently was lucky enough to purchase one of Anna Worden Baursmith's pattern for a quilted winter hood. I have been coveting one of her hoods since she started making and selling them earlier this fall, but not having a ton of spare cash lying around, I figured that having one of these hoods was just a dream. But! To cater to her seamstress admirers, she also put out a pattern for her hoods and I snatched one up.

I just finished my first hood from this pattern and I am really very happy with how it came out. It's nice being able to use a pattern and not have to alter it or toss the instructions and make it up on your own. Plus the booklet that comes with the pattern is jam packed with helpful tips, observations, research and documentation.

This hood is shaped more like a fashion bonnet. The past hoods I have made have all been very sunbonnet-like, so it was nice to have a change from that with this pattern. Both styles are correct for the era, but I think this one has a more restrained and formal appearance than ones that are based on a sunbonnet style. It would be lovely to wear for period church services, I daresay even weddings or funerals, shopping, visiting and even Christmas caroling.

I made mine from a pair of silk dress slacks I got at the thrift shop. It was part of a silk pantsuit I got for a few dollars. I am not a fan of the pantsuit look (at least on myself) but the jacket was very cute, and I saved the pants to cut up and use for a project like this. It's actually a really nice silk. It is lined with white cotton sateen and interlined with 2 layers of cotton batting and all hand quilted. It was a little difficult (and painful at times) to quilt the silk since it is so tightly woven the needle would not easily slip into the fabric, but at last the job was done although some of the lines came out a bit crookedy.

I like it. Despite the fact that no wool was used, it really is nice and light and warm. It will be my awesome go-to bonnet for any event that will be taking place in less than 65 degrees.

I did make one little alteration to the pattern. Made up exactly as the pattern said, the neck was a little loose on me. So I made a small box pleat at the center back edge of the tip. It took in the neckline just the little bit I needed.

I have a huge lime green silk shirt that I think I will try to make another one in. What I will do with a lime green bonnet I have no idea. But I think it will look awesome, especially if I can find a little bit of fur to trim it in.

Love,
Sarah

Monday, January 18, 2010

Making an 1860's Fashion Bonnet, Pt. 1

I have been feeling driven by unseen forces to make our necessary clothing items for this years reenactment season now. For the first time since I have had children, I am taking somewhat of an interest in developing my own personal wardrobe. I have been very apathetic towards reenacting for a while, if not openly hostile. However, this year I am really excited about the season starting and since the boys are older and are behaving so well now, I think this year will go splendidly. For a long time I have wanted a fashion bonnet. Being me, of course, I didn't want to spend money on a purchased one. Even before I was married, when I really could afford a nice fashion bonnet, just spending $200+ on a bonnet went against my common sense. I tried to make my own. That failed. The one that actually seemed to suceed was sat upon at the first reenactment I wore it to by a gentleman of large and heavy countenance. It, to put it flatly, was squashed. It was a rather pretty bonnet too. Purply-silver silk with cream silk ties, and trimmed with white net and yellow roses. Alas. It had a very short life.

I have been developing my love for the Practical Sunbonnet these past years. I have made lots of sunbonnets. I've made several woolen hoods for winter time and knitted a sortie cap that, with fringe and pretty ribbons, gave a "fancier" appearance than a plain sunbonnet.

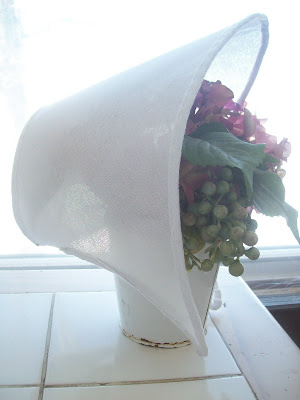
But now. The time has come to make a fashion bonnet. I really do need one to wear to different events where one would be the obvious choice of headware for a woman of the period. I dug some buckram out of my stash and raided David's toolboxes for wire and wire cutters. Using one of the first patterns I ever bought, a Millers Millinery pattern (slightly modified) I cut out the shape with buckram and covered the edges with tape enclosed wire. For lack of a Fake Head, these flowers model the buckram form for you to see:
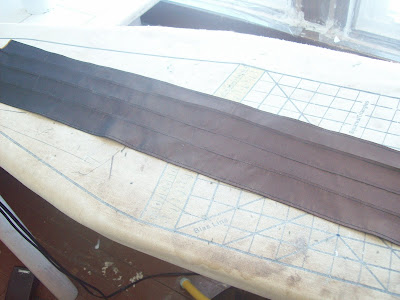
And the front view:Once the form was finished, I breathed a sigh of relief. The form was always a terribly hard thing for me to finish in my prior attempts. I turned my thoughts to the covering. I asked my friend Amy for advice and, not really knowing what I was doing, I first covered the tip with a piece of cotton batting and then sewed on the tip covering in brown taffeta. (I've always always always wanted a brown bonnet). Then I had to decide what kind of covering I wanted on the outside - smooth, or drawn? I've always always always wanted a brown drawn bonnet. The drawing part looked so incredibly complicated, but thanks to some great informational posts about creating this style on the Sewing Academy, I cut two rectangles from the taffeta, sewed some narrow tucks into each one and started drawing the tucks over flexible, narrow reed. (A lovely gift from my friend Amy!) Forgive my hideous ironing board cover. We have hard water. I need to make a new cover. I was stunned and pleased when I had good results with it. It was exactly the look I was going for. I sewed the first drawn row around the tip. Then I started drawing up the second row. I think that was a mistake. I think I ought to have drawn up all the rows while the rectangle was still flat - not sewn to the form - because it was incredibly difficult to thread the reed through the channel while the rectangle was sewn to the form. Several times, the reed broke when I was almost done threading it and I had to take it all out and do it over again. I sweated and trembled, but at last the first rectangle was done. Here is a picture of the first rectangle-in-progress:Then I had to cut another rectangle to cover the brim area. This overlaps the other rectangle at the sides, and just meets the other rectangle at the center front, to account for the curved shape of the brim. The first row of reed I sewed along the brim line, then the rest were drawn up and tacked at the edges. Once that was done, I tacked the covering to the form in a few places. Then, gasp, the most horrid thing happened and a reed broke while I was tacking the last place down. I didn't feel like taking the reed out to replace it, so I sewed through the reed before and after the breaking point to hold it in place. I plan to cover that spot with trim, so hopefully it will not be noticeable on the finished item.
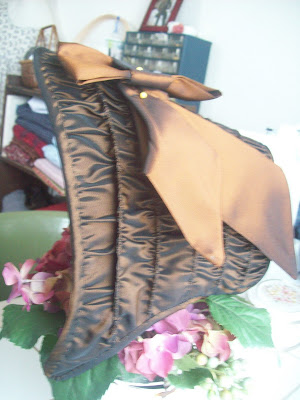
I then bound all the edges of the bonnet with bias cut from the fashion fabric. For fun, I experimented with some different trim ideas for the outside. I feel I don't want very much trim on the outside, since the drawn fabric is pretty decorative in and of itself. However, I like this trim pretty well, although in the final version it will be tacked into place a bit more thoughtfully than this appears, just being stabbed in with a pin:
Next part: Sewing in the facing and lining. Which has yet to be finished! Then the curtain, ties, and trimmings. . .

And dear readers, your opinion and taste is desired - what colors for trimming (inside the brim, flowers and such) would look well with this color brown? I desperately want yellow roses, but David doesn't think yellow and brown would look very nicely together.

Love,

Sarah