
 A few months ago, I spent a half hour per day for a few day successively, tearing some of the scraps into 4” squares. I figured if I had the squares already torn and pressed, I would be more likely to actually sew a quilt top with them. I was right. In the course of a few days in December, I made Judah a 9-patch quilt, twin-sized and tied. It made a very very very small dent in my squares. And an even smaller dent in my scrap fabric stash.
I was getting sick of seeing piles of squares everywhere in my sewing area. They seemed to breed and multiply. No matter how I put them up, or into what dim and dismal drawer I might shut them, they somehow escaped and reappeared. I ignored them. They silently screamed at me. They made their way into the towel cupboard, the laundry baskets, on top of books on our bookshelves until I could ignore them no longer. I had to use them up.
Last week, in spare time between sewing up David’s overalls, I pieced Malachi a quilt top. I meant to make one for him anyway but planned on giving it to him for his 2nd birthday. Due to the insubordination of my scrap squares, he is getting it sooner. To use up as many squares as I could, I made 9-patch blocks with sashing in between the blocks. I did not alternate them with plain squares, like I did with Judah’s quilt. I used up a good many squares this way but I still have a lot left in more “girly” prints and colors. I guess I’ll need to make another top pretty soon.  I was happy with how it came out although not all the seams match up like they should. I didn’t try to coordinate anything in the quilt so it is a true “scrap” quilt. Some of the colors clash, and some of the plaids and prints are downright ugly, but altogether I am pleased with how it looks in the end. Since Malachi still has his baby quilt that he sleeps with I am going to take my time in finishing it. I would like to hand quilt all of it instead of tying it. I don’t know how long that will take me, but I think it will look nice in the end.
Since this week is the last week in February, I’ve been scrambling to get all my outside sewing projects done. I didn’t think I’d had much to do over the winter but it turned out to be more than I thought. My goal was to get it all completed before the end of February so I could focus on sewing for our own family after that. I finished my friend Katherine’s summer sheer dress this week and made her two petticoats for beneath it so that is done. Today I finished up some clothing items for a little 5 year old boy in our reenacting group.
 I knew since last fall I’d be making him some things over the winter but it took me a while to figure out exactly WHAT to make for him. He could possibly wear tunics at this age, or button suits, or even dresses but it was hard to find a balance between what would be common in the period, and yet acceptable to his parents and to himself, that is, not too girly looking or too different from the clothes he wears in modern life. And in all this, the garments had to be big enough to fit him until the end of the season, allowing for growth and expansion, as needed.
I settled on some side-opening trousers (a style that can be worn by little boys), a few basic square cut shirts, a sack coat and a cloth cap and some button-on braces to hold the trousers up. All together he has a red plaid cotton shirt, a white cotton shirt, brown twill full length trousers, gray corderoy and also black cotton twill short trousers, cotton canvas braces, a fully lined gray corderoy sack coat with black cotton trim, a black cotton twill cap with a flat sewn taffeta bow tacked on at the side and a blue and white spotted cotton necktie. I didn’t make him any under things since they weren’t requested and I’m not sure what sort of under things he is used to in modern life since he is currently in the process of being fully potty trained. I hope these will last him til the end of the fall!
I feel very happy and fulfilled that I have finished all this before the end of February. Now I have a few more days “extra” in the month. That is always a good feeling.
And to keep me company, please allow me to introduce a certain gentleman who has been staying with us these past seven months. He is a gentleman of clean and quiet habits and, if perhaps tending a bit too much to indolence and lethargy, we acquit him of these charges in lieu of his polite manners.
 His proper name is Nathan Bedford Forrest, but we affectionately call him “Kitty” or “Cat” and only rare use his full title. David brought him home as a wee thing, perhaps only three or four weeks old, back in September. He and three sisters were left inside a pipe leading into our church and no mother was seen and so, a few days after the babies were discovered, David brought our little boy home. He is a striking kitty, mostly white with a silver tinge and darker silver on his striped tail (it looks like a coon tail) and on his face and the tips of his ears. His eyes are still blue. And we all love him. Judah and Malachi use him for a pillow and he has never hissed. Being raised with our boys since an infant himself, our Mr. Cat does at times display the fact that he feels himself quite on an equal level with humans, but that is forgivable.
Love,
Sarah


 He is, as I have said, very hard on his clothes. I hated it when he bought overalls since they faded very quickly and soon developed holes in the knees and the back pockets, where he keeps his wallet. I was forever patching and mending them. The buttonholes always stretched out or tore and it drove me crazy figuring out how to sew them smaller and tighter. His plaid shirts likewise soon wore out. I told him it was because he only had two or three, and that if he had more and wore the ones he had less, they would last longer. He didn't go for that. He could only wear one shirt at a time, he said, and no matter what shirts they were, they would wear. Besides, he pointed out, shirts in his size are expensive (he wears a Tall size, which is hard to come by).
 The finished cage gave a nice circumference and shape, but it was a bit flat in the back. My last cage was also a bit flat in the back. I decided to make a "bum pad" to help give a bit more "oomph" to the back. I made a slightly crescent shaped pillow and stuffed it with filling from an unused feather pillow in our possession. I sewed on twill tape ties and tried it on beneath the cage and - it worked! It gives a nice back thrust. I tried it on without the cage and it will work wonderfully with plain petticoats for occasions when I do not need to wear a cage. I love eras where it is desirable and pretty to have a big bum. :)
  Finally, here is a new slat bonnet. I had only a very small amount of this fabric left from making Judah's quilt, so the crown area is pieced in 3 places. The bias cut ruffle around the edge is pieced in 12 places! Still, it is hard to tell where the piecing is. The dark color and print help to hide the joins. It is a basic style but I wanted to pretty it up a bit, thus the bias ruching. The fullness in the ruching is very minimal - just 25% bigger than the edge of the sunbonnet - but it still fulled up nicely, thanks to the bias cut of the fabric.
  I have so much left to do for our reenacting season. And I'm already burned out on mid-19th century sewing. I'm in a regency mood again! And I need to make some 18th century petticoats so I can get started on my 1780's/1790's gowns. :P
  Ah! The gallant and gregarious Mr. Huber! Who else would ask me to make a navy uniform? Who else would give me this chance to fulfill a dream of mine? How very glad I am of David's choice of friends.
 "Naval uniforms of the day were made of anything blue the Sailors could get their hands on. Even issue uniforms were not standardized. The "Frock"(called a jumper after 1913) was generally made of a light weight flannel much like US Army contract shirts. The trousers were generally of a heavier kersey. There are surviving uniforms where the frock and trousers were made of the 8-10 oz wool flannel that Army fatigue blouses (Sack coats) were made from. This fabric actually continues in use as the standard fabric and color of US Navy uniforms until the big change in 1933 when the Navy goes to the heavy dark melton that was worn through WW2 into the 1970s.Ross is correct in that the most common style of trousers were fly front with mule ear pockets. Mostly fall front trousers survive today because they were non regulation and reserved for, again, going ashore on liberty. Some fall front trousers were worn aboard ship, but they were not the norm for daily wear, and at that time the Navy was issueing fly front mule ear pocket trousers. The sizing gussett in the rear tends to be about 5-6 inches deep. This is because the trousers are to fit snug from the waist to the top of the hips. They should fit loosely from there down to allow freedom of movement. The best way is to get a measurement at the natural waist (have him stand at attention), then subtract one inch. Once the uniform is finished, the undershirt and frock are tucked in. Then tighten up the sizing gussett. Funny story, when I was training Naval recruits, one of my favorite days was when the recruits tried on their dress blue trousers for the first time. They would pull them on and then I would tell them that bunk mates were to tighten up and tie the laces of their bunkmates Always a great bunch of expressions on the young lads faces with that one. The formula for cuff width is measure the thigh, add four inches and carry that from crotch to cuff.On the frocks. The collar (that is what that hangy down thing in the back is called) was not a standard length. 9 inches was pretty common, but photos and originals tell us they could be any whaer from standard shirt collar length to 11 inches. When you are putting the frock together, if you think of it as a collar, you will be able to work with it easier. The length of the frock should be fairly long. Again, it was to be tucked in and worn some what "blousey at then waist. When the sleeves are unbuttoned, the edge of the cuff should hang to the first knuckles on the hand. They should be a bit blousey also. This was so the Sailor could reach and stretch his arms out and not be restricted in movement by his clothing. That is not good 90 up in a mast." ~ courtesy of Mr. Steve Hesson
 I was very nervous about the frock since I have never made anything like it before. I downloaded the
  The seams are all felled and all the buttonholes are hand made, as usual. The decorative topstitching at the slit opening I outlined with a chain stitch in silk twist, just to give the design a bit more "oomph" and make it stand out a bit from the fabric. It was very easy to make. I added a breast pocket per Mr. Hubers request where he can store his whistle.
  I lengthened the collar just a tad bit, so its finished width is about 9".
 And, lastly, I sewed up a flat cap. Mr. Huber has another purchased cap that he obtained prior to his obtaining his fabric but it did not fit him quite well. This one is made with leftover scraps from the uniform and is quite plain. I do not know what sort of insignia Mr. Huber would desire for the center, so the top has no decoration. In many photos I've seen, the caps appear to have a round decoration in the top center and, based on information I've read, this was a certain defining insignia that sailors would put on their caps to indentify themselves so that, in a battle, one would not mistakenly fire upon ones own friend.
  I long to make another uniform now. The first of anything is always a practice run and even though I am happy with how this came out I think I could do a better job on a second uniform. Hmm. Perhaps I can convince Mr. Huber to allow me to make him a summer frock. . .
 I have been pleased to observe that these tunics are totally unrestrictive. The boys have climbed, jumped, wrestled, ran and eaten while wearing these and they don't even seem to notice they are wearing them anymore.

 One feature that we included is the removable undersleeve. Katherine thought short sleeves would be very nice for dancing in so the long lower sleeve (a loose coat sleeve style) fastens seperately to the armscye, allowing the short ruffled sleeve to be worn alone if desired.
 The dress is not quite done, as it yet needs to be hemmed (with a facing) and I need to make two petticoats to be worn beneath it, but it does not need much work at all and very soon it will be ready to be put away til the warmer weather arrives. And then, I will be so very pleased to see my dear friend wearing this gown! I think she will look beautiful in it.
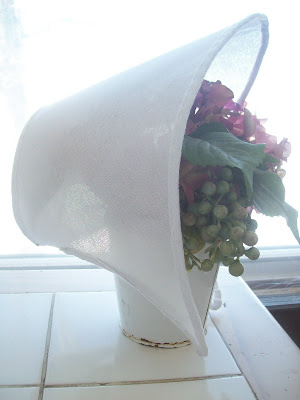 And the front view:
 Once the form was finished, I breathed a sigh of relief. The form was always a terribly hard thing for me to finish in my prior attempts. I turned my thoughts to the covering. I asked my friend
 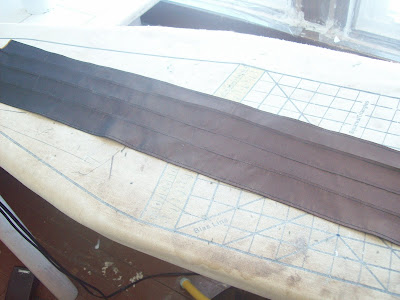 I was stunned and pleased when I had good results with it. It was exactly the look I was going for. I sewed the first drawn row around the tip. Then I started drawing up the second row. I think that was a mistake. I think I ought to have drawn up all the rows while the rectangle was still flat - not sewn to the form - because it was incredibly difficult to thread the reed through the channel while the rectangle was sewn to the form. Several times, the reed broke when I was almost done threading it and I had to take it all out and do it over again. I sweated and trembled, but at last the first rectangle was done. Here is a picture of the first rectangle-in-progress:
 Then I had to cut another rectangle to cover the brim area. This overlaps the other rectangle at the sides, and just meets the other rectangle at the center front, to account for the curved shape of the brim. The first row of reed I sewed along the brim line, then the rest were drawn up and tacked at the edges. Once that was done, I tacked the covering to the form in a few places. Then, gasp, the most horrid thing happened and a reed broke while I was tacking the last place down. I didn't feel like taking the reed out to replace it, so I sewed through the reed before and after the breaking point to hold it in place. I plan to cover that spot with trim, so hopefully it will not be noticeable on the finished item.
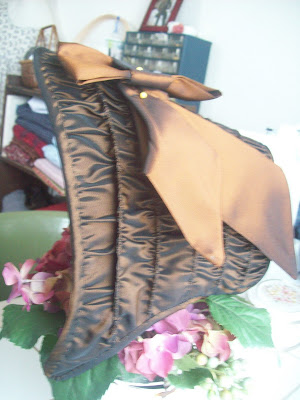 Next part: Sewing in the facing and lining. Which has yet to be finished! Then the curtain, ties, and trimmings. . .
 They are made with instructions and tips being taken from all sorts of places - the
  These pictures were taken last night of my adjusted stays - I don't really care to show the pictures of them before I created the center seam since they were so awful! :) I'm sorry they are blurry and dark, but I didn't feel like taking new pictures today and having to lace up those stays all by myself. That will take some getting used to!
  They are shown with my regency chemise since I haven't made a proper shift yet.
  I will be making my shift using the instructions in the JP Ryan Basic Women's Wardrobe pattern except I think I'll make a small cuff instead of using a drawstring in the sleeve.
  I particularly want to make three gowns to wear with these stays. One is a Caraco Jacket and petticoat from Janet Arnolds pattern, dated 1775-1785.
  The second is a round gown based on Janet Arnolds pattern for a polonaise, dated 1770-1785. I plan to use the bodice pieces but will make the skirt closed with a fall front opening instead of an open skirt.
 The third is a chemise a la reine, which probably won't take place for a while since wearing white is just impractical for me at this point in my life. (children think Mommy's skirt is an always-available and accomodating napkin) But still, eventually I want to make one since I've wanted one for a long time. I'm thinking it would make a nice Easter dress. I don't have a picture of it, but you can see a beautiful reproduction that first inspired me to make one at
  I did find time to finish up a set of short stays from the Sense and Sensibility Regency Underthings pattern. I got the pattern a few weeks ago and had not yet used it til yesterday when I cut out the short stays. I don't really need a new set but I was curious to see how they went together and if the size I normally make would work for me.
  They went together very easily and quickly - I finished them today - but the size is absolutely enormous on me. I can usually wear a pattern size 18 from the S&S things but not with this. My underbust measurement is 30". The underbust measurement on the finished size 18 stays is 37". WAY big. And the cup size, cut with gussets in a D cup, barely goes a quarter of the way up to the midline of the bust. The width of the cup could work for me, with some amount of squishing, but the gussets need to be a lot longer for my particular size. So. They are now For Sale, and I posted them in my Etsy shop. Somewhere out in this great world there must be someone whom these will fit prettily.
  I corded these, instead of boning them. I wanted to get in some practice on cording so I can remake my 1820's/1830's stays with cording instead of boning. I was shocked at how easy and how quick the cording process went. I have no idea why I have thought that cording took so much time and was so hard to do. It's not, and I love how it looks and how it gives firm yet flexible and comfortable support. I can't wait to make a fully corded corset of my own now!
 I have so many projects I want to start on right away. There is a gorgeous 1790's gown in Costume in Detail that I long to copy as well as a drop front regency dress that I simply am dying to make up. For some reason, post-Christmas is always a very regency time for me. It may have something to do with the fact that several Christmas's ago I received the dvd of Pride and Prejudice and consequently, each year at that time I get into a regency mood again. Plus I have my 18th century stays to keep working on and I also want to make all of us a Tudor outfit (peasant) for a Ren Faire about six months from now (if we go. We'll have to give up a CW reenacmtent to go to it and David still isn't sure if he's willing to do that or not!)
 It took me a little while to figure out how I wanted to attach the ruffle. I debated over whether drawing it up over a cord or hemming the top side and attaching it directly to the skirt. At last I decided on a more practical solution that will hold up the best to every day wear and washing in a modern washing machine. I just gathered the ruffle and covered the top edge with a bias band and then turned under and hand stitched the top of the bias band to the skirt. This way I had way less handsewing to do (since I like to handstitch everything that can be seen from the outside) and it is very sturdy. I really like the ruffle. It gives a little added feminine flair and also helps the skirt obtain that characteristic 1820's triangular/gored shape.
 The bias band also helps to hide the imperfections of the fabric I used. It was a $1.50 cotton from Wal Marts bargain table and the check is not woven, it is merely printed. The print was not exactly on grain so the lines of the print do not match the straight torn lines at the top and bottom of the skirt as well as the top and bottom of the ruffle. I chose to add the ruffle to hopefully help hide the lines of the print at the plain skirt hem and the bias band to hide the weirdly angling lines of the check where I attached the ruffle.
 I am NOT looking forward to sewing on hook and eyes. You know when you reach that point of hand sewing where your fingers are rough and indented with millions of tiny pin and needle pricks and catch on everything you touch? I am at that point now. But I Must Get This Done. I suppose I will work on it while sitting directly in front of the oven watching my muffins with suspicion and passionate eagerness - "Oh, please come out right this time!"
 The tree is up, and each day the mailman usually delivers a Christmas card or two from dear friends and beloved family. Each card is duly admired and read and then hung upon our mantle with the others, til Christmas Eve, when they will be taken down and replaced with our stockings.
 "Victorian Roses"
 "Autumn Colorsplash"
 I have also been slowly working on my dress for Christmas Eve. It is going very slowly as I keep having to postpone work on it for some reason or the other. It is an 1820's style and I think this is the last dress I will make in this style for a little while. It is getting - old. I still really like the overall look, I'm just tired of making dresses with this overall look at the the moment. The process gets so monotonous. Here is the bodice. It is made of a cream and cranberry check cotton with a darted bodice, scoop neckline and piping. The sleeves are bishop sleeves, based on a drawing of different sleeve styles in Patterns of Fashion 1.
  Here is the point of construction that I am at now. I have the skirt pinned to the waistband but not sewn on yet. The folded up fabric you see laying on the neck will be an 8" wide ruffle all around the hem. The skirt is made from one 45" wide rectangular panel in the back and three gores in the front. To make the gores I folded a 45" wide rectangle, cut to my preferred hem length, in half and drew out a gore that was appx. 15" wide at the top and 35" at the hem. The two pieces left over after I cut out the center gore I used as side gores. This gives maximum fullness at the hem but a smooth line at the top. I did lightly gather the front of the skirt in case I ever wear this if I am pregnant again. Room to grow is always a good thing!
 To finish it, I plan to add the ruffle and trim the top of the shoulders with cranberry taffeta bows with perhaps another bow at the center front neckline and a cranberry taffeta sash or belt. I also just got the Sense and Sensibility Regency Underthings pattern and would love to make a turn back collared chemisette to wear with it from some sheer voile I have.