
I have been feeling driven by unseen forces to make our necessary clothing items for this years reenactment season now. For the first time since I have had children, I am taking somewhat of an interest in developing my own personal wardrobe. I have been very apathetic towards reenacting for a while, if not openly hostile. However, this year I am really excited about the season starting and since the boys are older and are behaving so well now, I think this year will go splendidly. For a long time I have wanted a fashion bonnet. Being me, of course, I didn't want to spend money on a purchased one. Even before I was married, when I really could afford a nice fashion bonnet, just spending $200+ on a bonnet went against my common sense. I tried to make my own. That failed. The one that actually seemed to suceed was sat upon at the first reenactment I wore it to by a gentleman of large and heavy countenance. It, to put it flatly, was squashed. It was a rather pretty bonnet too. Purply-silver silk with cream silk ties, and trimmed with white net and yellow roses. Alas. It had a very short life.
I have been developing my love for the Practical Sunbonnet these past years. I have made lots of sunbonnets. I've made several woolen hoods for winter time and knitted a sortie cap that, with fringe and pretty ribbons, gave a "fancier" appearance than a plain sunbonnet.
But now. The time has come to make a fashion bonnet. I really do need one to wear to different events where one would be the obvious choice of headware for a woman of the period. I dug some buckram out of my stash and raided David's toolboxes for wire and wire cutters. Using one of the first patterns I ever bought, a Millers Millinery pattern (slightly modified) I cut out the shape with buckram and covered the edges with tape enclosed wire. For lack of a Fake Head, these flowers model the buckram form for you to see:
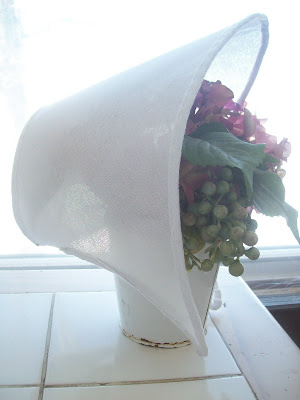 And the front view:
 Once the form was finished, I breathed a sigh of relief. The form was always a terribly hard thing for me to finish in my prior attempts. I turned my thoughts to the covering. I asked my friend Amy for advice and, not really knowing what I was doing, I first covered the tip with a piece of cotton batting and then sewed on the tip covering in brown taffeta. (I've always always always wanted a brown bonnet). Then I had to decide what kind of covering I wanted on the outside - smooth, or drawn? I've always always always wanted a brown drawn bonnet. The drawing part looked so incredibly complicated, but thanks to some great informational posts about creating this style on the Sewing Academy, I cut two rectangles from the taffeta, sewed some narrow tucks into each one and started drawing the tucks over flexible, narrow reed. (A lovely gift from my friend Amy!) Forgive my hideous ironing board cover. We have hard water. I need to make a new cover.
 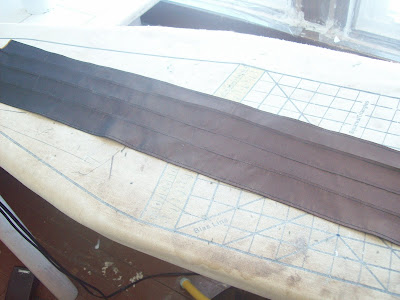 I was stunned and pleased when I had good results with it. It was exactly the look I was going for. I sewed the first drawn row around the tip. Then I started drawing up the second row. I think that was a mistake. I think I ought to have drawn up all the rows while the rectangle was still flat - not sewn to the form - because it was incredibly difficult to thread the reed through the channel while the rectangle was sewn to the form. Several times, the reed broke when I was almost done threading it and I had to take it all out and do it over again. I sweated and trembled, but at last the first rectangle was done. Here is a picture of the first rectangle-in-progress:
 Then I had to cut another rectangle to cover the brim area. This overlaps the other rectangle at the sides, and just meets the other rectangle at the center front, to account for the curved shape of the brim. The first row of reed I sewed along the brim line, then the rest were drawn up and tacked at the edges. Once that was done, I tacked the covering to the form in a few places. Then, gasp, the most horrid thing happened and a reed broke while I was tacking the last place down. I didn't feel like taking the reed out to replace it, so I sewed through the reed before and after the breaking point to hold it in place. I plan to cover that spot with trim, so hopefully it will not be noticeable on the finished item.
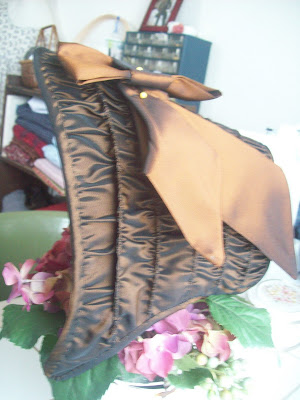
I then bound all the edges of the bonnet with bias cut from the fashion fabric. For fun, I experimented with some different trim ideas for the outside. I feel I don't want very much trim on the outside, since the drawn fabric is pretty decorative in and of itself. However, I like this trim pretty well, although in the final version it will be tacked into place a bit more thoughtfully than this appears, just being stabbed in with a pin:
 Next part: Sewing in the facing and lining. Which has yet to be finished! Then the curtain, ties, and trimmings. . .
And dear readers, your opinion and taste is desired - what colors for trimming (inside the brim, flowers and such) would look well with this color brown? I desperately want yellow roses, but David doesn't think yellow and brown would look very nicely together.
Love,
Sarah


 They are made with instructions and tips being taken from all sorts of places - the
  These pictures were taken last night of my adjusted stays - I don't really care to show the pictures of them before I created the center seam since they were so awful! :) I'm sorry they are blurry and dark, but I didn't feel like taking new pictures today and having to lace up those stays all by myself. That will take some getting used to!
  They are shown with my regency chemise since I haven't made a proper shift yet.
  I will be making my shift using the instructions in the JP Ryan Basic Women's Wardrobe pattern except I think I'll make a small cuff instead of using a drawstring in the sleeve.
  I particularly want to make three gowns to wear with these stays. One is a Caraco Jacket and petticoat from Janet Arnolds pattern, dated 1775-1785.
  The second is a round gown based on Janet Arnolds pattern for a polonaise, dated 1770-1785. I plan to use the bodice pieces but will make the skirt closed with a fall front opening instead of an open skirt.
 The third is a chemise a la reine, which probably won't take place for a while since wearing white is just impractical for me at this point in my life. (children think Mommy's skirt is an always-available and accomodating napkin) But still, eventually I want to make one since I've wanted one for a long time. I'm thinking it would make a nice Easter dress. I don't have a picture of it, but you can see a beautiful reproduction that first inspired me to make one at
  I did find time to finish up a set of short stays from the Sense and Sensibility Regency Underthings pattern. I got the pattern a few weeks ago and had not yet used it til yesterday when I cut out the short stays. I don't really need a new set but I was curious to see how they went together and if the size I normally make would work for me.
  They went together very easily and quickly - I finished them today - but the size is absolutely enormous on me. I can usually wear a pattern size 18 from the S&S things but not with this. My underbust measurement is 30". The underbust measurement on the finished size 18 stays is 37". WAY big. And the cup size, cut with gussets in a D cup, barely goes a quarter of the way up to the midline of the bust. The width of the cup could work for me, with some amount of squishing, but the gussets need to be a lot longer for my particular size. So. They are now For Sale, and I posted them in my Etsy shop. Somewhere out in this great world there must be someone whom these will fit prettily.
  I corded these, instead of boning them. I wanted to get in some practice on cording so I can remake my 1820's/1830's stays with cording instead of boning. I was shocked at how easy and how quick the cording process went. I have no idea why I have thought that cording took so much time and was so hard to do. It's not, and I love how it looks and how it gives firm yet flexible and comfortable support. I can't wait to make a fully corded corset of my own now!
 I have so many projects I want to start on right away. There is a gorgeous 1790's gown in Costume in Detail that I long to copy as well as a drop front regency dress that I simply am dying to make up. For some reason, post-Christmas is always a very regency time for me. It may have something to do with the fact that several Christmas's ago I received the dvd of Pride and Prejudice and consequently, each year at that time I get into a regency mood again. Plus I have my 18th century stays to keep working on and I also want to make all of us a Tudor outfit (peasant) for a Ren Faire about six months from now (if we go. We'll have to give up a CW reenacmtent to go to it and David still isn't sure if he's willing to do that or not!)
 It took me a little while to figure out how I wanted to attach the ruffle. I debated over whether drawing it up over a cord or hemming the top side and attaching it directly to the skirt. At last I decided on a more practical solution that will hold up the best to every day wear and washing in a modern washing machine. I just gathered the ruffle and covered the top edge with a bias band and then turned under and hand stitched the top of the bias band to the skirt. This way I had way less handsewing to do (since I like to handstitch everything that can be seen from the outside) and it is very sturdy. I really like the ruffle. It gives a little added feminine flair and also helps the skirt obtain that characteristic 1820's triangular/gored shape.
 The bias band also helps to hide the imperfections of the fabric I used. It was a $1.50 cotton from Wal Marts bargain table and the check is not woven, it is merely printed. The print was not exactly on grain so the lines of the print do not match the straight torn lines at the top and bottom of the skirt as well as the top and bottom of the ruffle. I chose to add the ruffle to hopefully help hide the lines of the print at the plain skirt hem and the bias band to hide the weirdly angling lines of the check where I attached the ruffle.
 I am NOT looking forward to sewing on hook and eyes. You know when you reach that point of hand sewing where your fingers are rough and indented with millions of tiny pin and needle pricks and catch on everything you touch? I am at that point now. But I Must Get This Done. I suppose I will work on it while sitting directly in front of the oven watching my muffins with suspicion and passionate eagerness - "Oh, please come out right this time!"
 The tree is up, and each day the mailman usually delivers a Christmas card or two from dear friends and beloved family. Each card is duly admired and read and then hung upon our mantle with the others, til Christmas Eve, when they will be taken down and replaced with our stockings.
 "Victorian Roses"
 "Autumn Colorsplash"
 I have also been slowly working on my dress for Christmas Eve. It is going very slowly as I keep having to postpone work on it for some reason or the other. It is an 1820's style and I think this is the last dress I will make in this style for a little while. It is getting - old. I still really like the overall look, I'm just tired of making dresses with this overall look at the the moment. The process gets so monotonous. Here is the bodice. It is made of a cream and cranberry check cotton with a darted bodice, scoop neckline and piping. The sleeves are bishop sleeves, based on a drawing of different sleeve styles in Patterns of Fashion 1.
  Here is the point of construction that I am at now. I have the skirt pinned to the waistband but not sewn on yet. The folded up fabric you see laying on the neck will be an 8" wide ruffle all around the hem. The skirt is made from one 45" wide rectangular panel in the back and three gores in the front. To make the gores I folded a 45" wide rectangle, cut to my preferred hem length, in half and drew out a gore that was appx. 15" wide at the top and 35" at the hem. The two pieces left over after I cut out the center gore I used as side gores. This gives maximum fullness at the hem but a smooth line at the top. I did lightly gather the front of the skirt in case I ever wear this if I am pregnant again. Room to grow is always a good thing!
 To finish it, I plan to add the ruffle and trim the top of the shoulders with cranberry taffeta bows with perhaps another bow at the center front neckline and a cranberry taffeta sash or belt. I also just got the Sense and Sensibility Regency Underthings pattern and would love to make a turn back collared chemisette to wear with it from some sheer voile I have.


 The construction methods offered in the pattern seem a tad modern. I can’t say if they are inaccurate per se, but I like to construct my own dresses a bit differently with the lining and fashion fabric treated as one and seams overcast or left raw as per original dresses. The instructions call for sewing up the lining and fashion fabric separately and then sewing them right sides together and turning them. I prefer to use a turned self facing for opening edges (front or back) or piping for around the neckline and openings rather than using the method called for. The instructions also call for a center front or center back placket in the skirt. I like to use a center back skirt opening for a back fastening dress but prefer a dog leg closure on a front opening dress to avoid a seam or placket in the center front of the skirt. The instructions also call for the top of the skirt to be gathered along the raw edge and stitched directly to the waistband or bodice. A period method would be to turn under a little of the top of the skirt and attach the folded, finished edge of the skirt to the bodice with small whip stitches. This method makes a very smooth, low bulk waistline rather than having all the gathers or pleats bunched into the waistband.
  Technical Characteristics:
 Final Thoughts:
 Another lovely pattern by Sense and Sensibility! I think it is a lovely base pattern from which many serious costumers could create beautiful, appropriate gowns, combing outside research on fit and construction and additional style details with the information contained in the pattern. As is, the pattern creates a very passable dress and would be a wonderful and practical style to wear for everyday.
  I made most of the trousers early this spring. But uniform making duties forced me to postpone finishing them. They hung in the closet for months. I finally pulled them out and finished them a few weeks ago. I made the waistcoat last week, after the green corderoy disaster. This time I made sure to cut an ample seam allowance and the finished vest fits David quite nicely. It has 3 welt pockets, a notch collar and buttons up the front with seven covered buttons. David wore the set for the first time to church yesterday for our beginning of Advent service. He requested a red necktie to go with his outfit and looked, I thought, very festive.
  I was able to get my dress finished up on Saturday. I do like it very much although I am not completely happy with how the sleeves came out. I wish I had gathered the pouf to a point lower on the arm to get less of a mushroom effect. However, as Mr. Darcy said in his letter to Elizabeth, "It is done, however, and it was done for the best." Also to keep in the mood of Austen, here is a picture of the dress in front of a "prettyish kind of a little wilderness", where we plan on tilling up ground for our garden when spring comes.
 I don't usually wear a cap. I only wear one when the mood strikes. Here is a capless photo, though a tad risque - dear me, you can see my bare leg! - complete with this beautiful set of ultra-modern Fuzzy Snowflake Socks with White PomPoms. Don't they look wonderful with my repro mid-19th century boots? I didn't mean for this photo to be so alarming, I promise. It was the fault of the stiff breeze. Now you can see all my farby sinfulness!
 Here is a back view. I was appalled when I saw this photo - "David, is my rear end really that big?!" Thankfully big bums were "in" for most of the 19th century. In those times, looking like a woman with natural womanly features was desired and encouraged. Alas. How times have changed. But David was kind enough to tell me that it was my fluffy skirts and petticoats that gave the illusion of a bigger behind.
  I need to add a few more hooks along the wrist placket since the placket kept folding open yesterday, but other than that I think this will be a very serviceable house dress.
  Oh and yes - David has decided to grow side whiskers! I have become reconciled to the thought of a beardless husband. His look has grown upon me and I do like this new style very much. He looks rather like I imagine Col. Brandon when I think of him in my mind. David is becoming ever more interested in pre-CW times and, I think, it shall not be long ere he joins me in the 1820's and 1830's. He is currently afflicted with great passion for the 1840's and his next set of civilian attire is to hail from then.
  Love,
Love, I got quite sick late Wednesday. I've been working on a sewing job for a customer but since I was so sick I decided to put her things up for a little while so I wouldn't spread germs to her gowns. Instead I started a new day dress for myself. After all, it is getting colder and colder and so far I have only made one new dress for winter time.
  This one I wanted more of an early 1830's style. I used the same basic bodice pattern as for my pink gown but am making the sleeves a tad bigger. Instead of gathering the fashion fabric at the waist, I darted the lining as usual but tucked the fashion fabric and tacked the pleats down by hand. The sleeves have a slender undersleeve with a full puff sleeve mounted on top of that.
  I'm hoping to finish it up today. All it really needs is the skirt attached and the hooks sewn on. Then hopefully I'll feel well enough to get back to my work sewing once more.
 It was, he said, my fault. I cut his hair for him last Saturday and he asked me to trim his beard. Once I was done he said that his beard appeared to be shorter on one side than the other. I looked. It was indeed a little shorter. About 1/16" shorter. So, he surmised, the only possible thing for him to do was to shave it all off and start over with it.
  I begged. I pleaded. I got on my knees. I really did. It was of no use. The bathroom door was firmly shut and a few moments later I heard the sounds of scissors; the sound of David's beard being butchered. A half hour later he reappeared and the bathroom floor was littered with hair.
  I wouldn't kiss him for a long time. I had to get used to it. I felt that I had a different man in place of my husband. I am now finally starting to get used to it but his beard is already starting to come back in a stubbly, prickly shadow.
  Little David now checks his chin every day to see if he is getting a beard, himself.