

Marc Carlsons' site is a fantastic resource. It has drawings and often detailed descriptions about original clothing that has been found from this period. The particular garment that inspired these tunics is Herjolfsnes 44, which was originally worn by a young girl.
I was drawn to this style because of the very sensible and economical cut, the loose fit that accommodates rapidly growing children and the ability of this style to be made quickly. Which is, usually, (and unfortunately) a priority for me since I often put things off til the last minute and then scramble to get them done as quickly as possible.
 |
| Some Clothing of the Middle Ages -- Tunics -- Herjolfsnes 44, by I. Marc Carlson, Copyright 1997 This code is given for the free exchange of information, provided the Author's Name is included in all future revisions, and no money change hands- |
I was drawn to this style because of the very sensible and economical cut, the loose fit that accommodates rapidly growing children and the ability of this style to be made quickly. Which is, usually, (and unfortunately) a priority for me since I often put things off til the last minute and then scramble to get them done as quickly as possible.
Almost three years ago I made this style for Malachi from a lightweight yellow twilled wool:
 |
| The style is basically two rectangles for the body, two triangles for the sides with squared-off points, and two triangles for the center front and center back gores. And sleeves. |
It fit him for a long time. The only problem I had was getting his head to fit through the neck opening. Now, the neckline is a bit torn at the center front where his head broke several threads the last time I forced it over his head. I will need to make some repairs to it before Anne can wear it. (it is still rather too large for her.)

Back then, I made the same style for David and Judah, only leaving out the center front and center back gores. This was because I simply lacked time to put the gores in. I always intended to go back and put the gores in at some future point. . .but I never did. The center-goreless-style is one that is illustrated for young children in Sarah Thursfield's The Medieval Tailors Assistant, though, so I figured just side gores were okay, though they didn't gave the same amount of graceful fullness to the skirts.
This time around I went with the same style, only making the necklines keyhole, with a rather fitted neck and a center front slit. I made all 3 tunics in the space of about 4 days, including hand finishing of the seams, (except Little David's, though I could have finished his seams if I hadn't gotten very sick the day before the Faire!) so I was once again very pleased with how plain and straightforward this style is to put together.
To begin with, I measured the child (in this case, Judah) from shoulder to shoulder across the front. I added 1" to this measurement and that was the width of my body panels. I measured from the top of Judah's shoulder to the desired hem length (about mid calf) and added 3" for seam allowance and a hem. I used that for the length of the body panels. I cut two body panels and at the top of the panels, cut the shape for the shoulders and neckline.
For the side gores, I cut two rectangles of fabric the same width as the body panels and long enough to reach from Judah's under-arm to the hem. I pressed the rectangles in half and angled the sides so I ended up with a triangular piece that was narrow at the top (I made this narrow width the width necessary to go across the bottom of Judah's underarm), and wider at the bottom.
Here you can see the main body panels laid out, with the side gores laid next to them:

For the center front and center back gores, I cut a rectangle of fabric the same width as the body panels, and long enough to reach from Judah's waist to the hem. From one rectangle of fabric I was able to cut a full triangle and two half-triangles. The full triangle can be used as-is for a gore, and the two half ones seamed together to create a full triangle for the other gore.

Then it was time to sew!
I first finished the center front slit in this way:
I cut a rectangle of plain linen as long as the desired slit length, plus a bit extra.

I pressed this strip in half to find the center. I pressed the front body panel in half to find the center, and laid the linen on top of the wool, matching centers.

I secured the linen to the wool with pins.
 And began to stitch. I used the presser foot as a guide for the seam, lining up the presser foot with the center line.

Towards the bottom, I began to narrow this seam and started to guide the needle to the center line:
 Then leaving the needle in the fabric, I lifted the presser foot, swiveled the fabric and began to sew up the other side of the slit:

The finished seam:
 I carefully cut along the center line, to the very point of the slit, being careful to not cut the sewing threads.

The linen was folded to the inside and a narrow hem pressed under all around.

The linen was secured in place with slip stitches (by hand) and voila!

A neatly finished slit.

The next step was inserting the center gores. I began with the front gore and decided to use the full triangle as the center front gore. I cut a slit 1" shorter than the length of the gore on the front body panel:

The gore was pinned into the slit opening, right sides together. To accommodate the point of the gore, the seam allowance on the main body panels narrows as the tip approaches, though the normal seam allowance is retained on the gore itself: (it sounds way way more complicated than it really is!)

This makes a nice, smooth tip on the finished gore - no puckers! Here is a (blurry) picture of the seam allowance of the main body panel pinned to the gore. . .you can see how there are just a few threads that are sewn to the gore at the top of the slit.

The finished gore, after being sewn in, from the right side:
And the wrong side:

This method of putting in gores definitely requires finishing the seam or it is quite easy for the tip of the gore to tear out. I usually fold under the seam allowance of the gore and stitch it down to the main body panel, from the inside, and then reinforce the tip with whip stitches on the outside. I have never had a gore tip pull out for me during wear using this method.

Then it was time to do the same thing with the back center gore! I sewed the two half triangles together (this results in a slightly shorter, narrower, gore than the full-triangle one, but that is fine) and then sewed it in to the back gore slit the same way!

Here are the two body panels with the gores sewn in:

Then I sewed the front to the back at the shoulder seams:

And sewed the side gores to connect the body panels at the sides.
To finish the neckline, I cut a narrow strip of linen and sewed it with a narrow seam to the neck, right sides together.
 Because linen is naturally a bit elastic-y, it was easy to press it to the inside, and narrowly hem it to the wool.

Try on time! It looks a bit like a shapeless bag but will look better once the sleeves are in and the hem is sewn.

For the sleeves, I decided to go with shorter, looser sleeves. This is because the wool I used for Judah's tunic is a bit on the heavy side and would work really well as an over-tunic or surcote. In hot weather he can wear the short sleeves with his linen shirt as a cooler option than wearing something with long, tight sleeves. In cooler weather he can layer the short sleeve tunic over a long sleeve one for additional warmth.
The cut of the sleeves is just like a regular sleeve, only shortened. I flared the side seams out a bit for a more funnel-shaped sleeve, though for David and Malachi's sleeves I left the sleeves more fitted and plain.

The sleeve seam is sewn. The sleeve is positioned in the arm hole so that the seam goes up the back of the arm. I finished the bottom of the sleeve with a strip of linen as a facing.
 Sleeves are in!

The finished tunic:

I finished the seams by simply sewing them flat to the garment with an uneven running stitch (short on the outside, longer on the inside.) Usually I turn under the raw edge of the seam before sewing it to the garment but in this case, the wool was so thick that doing so would have made very bulky seams! So I just left the edges raw and stitched them down. I did this with David's blue wool over-tunic a few years ago and it has worn just fine with the finishing being done in this way.

Here is what the seam finish looks like from the inside (not as nice and pretty as having turned-under seams, but still, much less messy than leaving the seams not finished at all!)

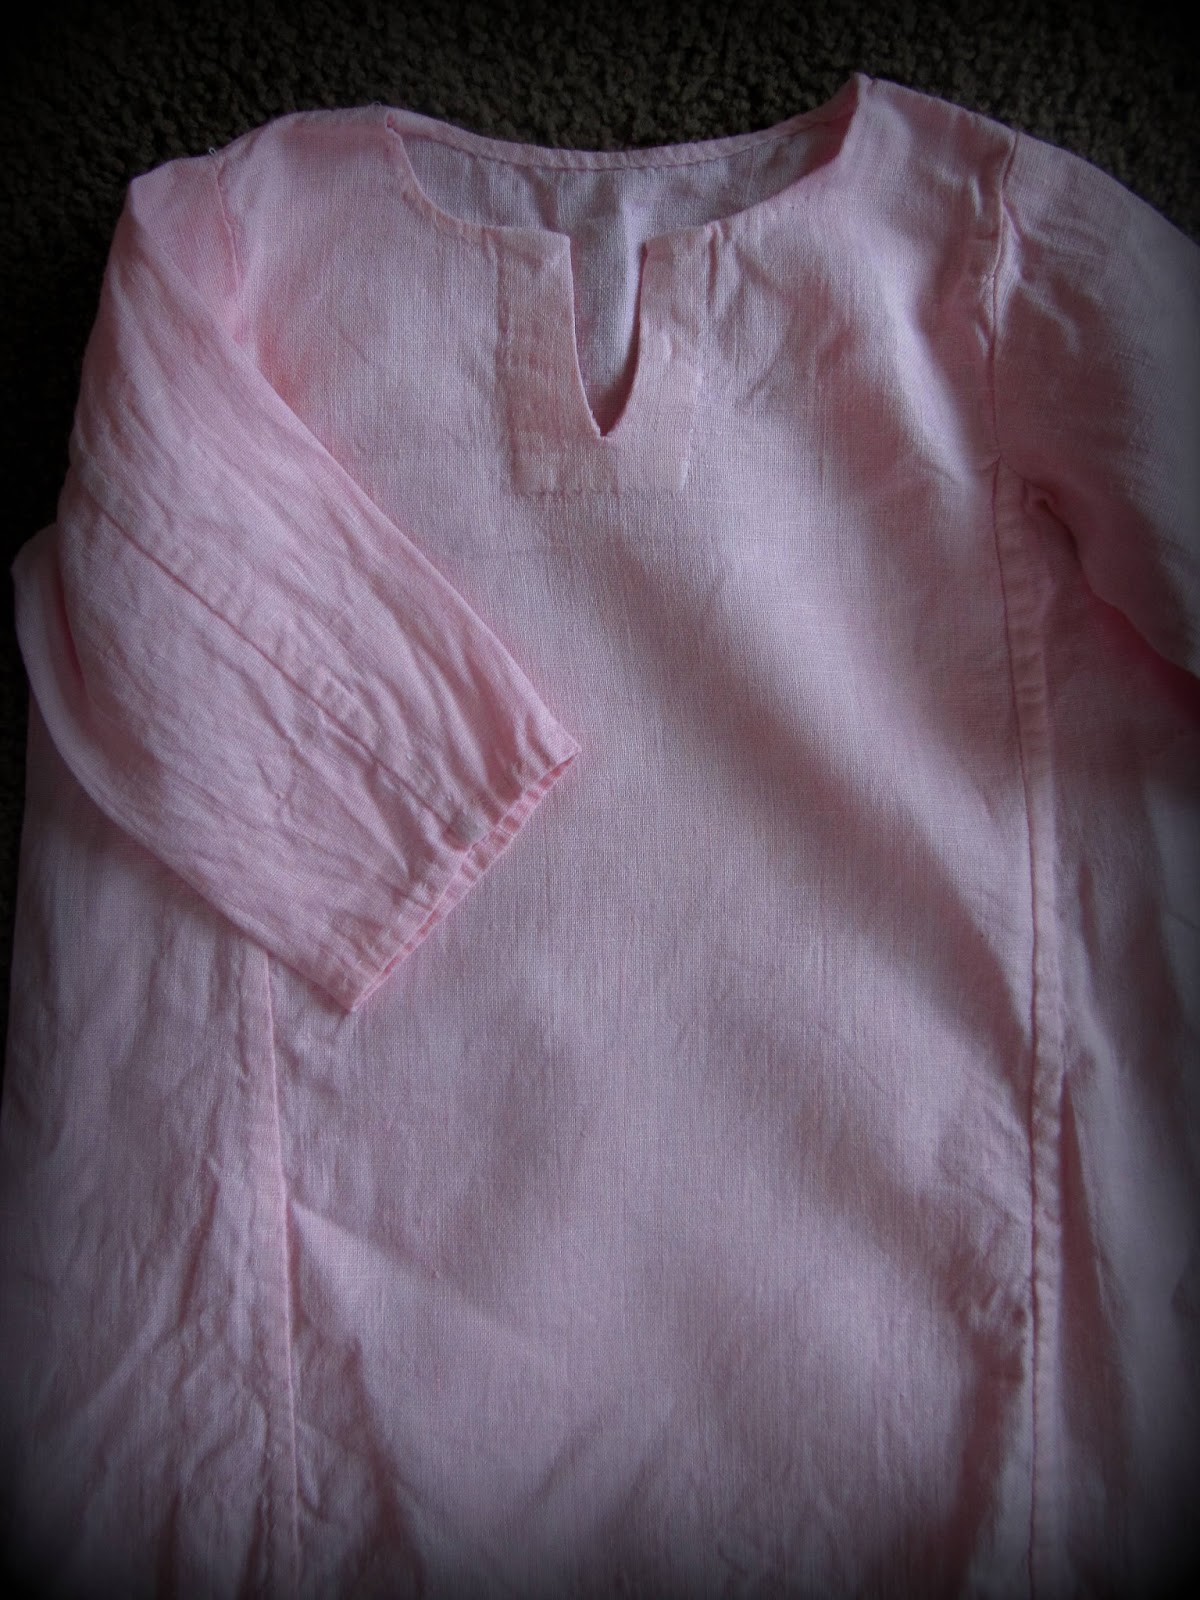
Anne's pink linen cote (to use the term used by Sarah Thursfield in The Medieval Tailor's Assistant) is made to the same pattern, only without the center gores and with long sleeves instead of short ones.

And here is one photo from the Faire showing all the children together! I have a few more I will post later.

Love,
Sarah
This time around I went with the same style, only making the necklines keyhole, with a rather fitted neck and a center front slit. I made all 3 tunics in the space of about 4 days, including hand finishing of the seams, (except Little David's, though I could have finished his seams if I hadn't gotten very sick the day before the Faire!) so I was once again very pleased with how plain and straightforward this style is to put together.
To begin with, I measured the child (in this case, Judah) from shoulder to shoulder across the front. I added 1" to this measurement and that was the width of my body panels. I measured from the top of Judah's shoulder to the desired hem length (about mid calf) and added 3" for seam allowance and a hem. I used that for the length of the body panels. I cut two body panels and at the top of the panels, cut the shape for the shoulders and neckline.
For the side gores, I cut two rectangles of fabric the same width as the body panels and long enough to reach from Judah's under-arm to the hem. I pressed the rectangles in half and angled the sides so I ended up with a triangular piece that was narrow at the top (I made this narrow width the width necessary to go across the bottom of Judah's underarm), and wider at the bottom.
Here you can see the main body panels laid out, with the side gores laid next to them:

For the center front and center back gores, I cut a rectangle of fabric the same width as the body panels, and long enough to reach from Judah's waist to the hem. From one rectangle of fabric I was able to cut a full triangle and two half-triangles. The full triangle can be used as-is for a gore, and the two half ones seamed together to create a full triangle for the other gore.

Then it was time to sew!
I first finished the center front slit in this way:
I cut a rectangle of plain linen as long as the desired slit length, plus a bit extra.

I pressed this strip in half to find the center. I pressed the front body panel in half to find the center, and laid the linen on top of the wool, matching centers.

I secured the linen to the wool with pins.


Towards the bottom, I began to narrow this seam and started to guide the needle to the center line:


The finished seam:


The linen was folded to the inside and a narrow hem pressed under all around.

The linen was secured in place with slip stitches (by hand) and voila!

A neatly finished slit.

The next step was inserting the center gores. I began with the front gore and decided to use the full triangle as the center front gore. I cut a slit 1" shorter than the length of the gore on the front body panel:

The gore was pinned into the slit opening, right sides together. To accommodate the point of the gore, the seam allowance on the main body panels narrows as the tip approaches, though the normal seam allowance is retained on the gore itself: (it sounds way way more complicated than it really is!)

This makes a nice, smooth tip on the finished gore - no puckers! Here is a (blurry) picture of the seam allowance of the main body panel pinned to the gore. . .you can see how there are just a few threads that are sewn to the gore at the top of the slit.

The finished gore, after being sewn in, from the right side:
 |
| After sewing this particular gore in, I realized I sewed it wrong side out. I had to tear it out and resew it in, so I did get a bit of fuzzing at the tip, which you can see in this pic. |
And the wrong side:

This method of putting in gores definitely requires finishing the seam or it is quite easy for the tip of the gore to tear out. I usually fold under the seam allowance of the gore and stitch it down to the main body panel, from the inside, and then reinforce the tip with whip stitches on the outside. I have never had a gore tip pull out for me during wear using this method.

Then it was time to do the same thing with the back center gore! I sewed the two half triangles together (this results in a slightly shorter, narrower, gore than the full-triangle one, but that is fine) and then sewed it in to the back gore slit the same way!

Here are the two body panels with the gores sewn in:

Then I sewed the front to the back at the shoulder seams:

And sewed the side gores to connect the body panels at the sides.
 |
| Next time I think I will make the side gores 1.5 x the width of the body panels, or possibly 1.75 instead of the same with as the body panels. |
To finish the neckline, I cut a narrow strip of linen and sewed it with a narrow seam to the neck, right sides together.


Try on time! It looks a bit like a shapeless bag but will look better once the sleeves are in and the hem is sewn.

For the sleeves, I decided to go with shorter, looser sleeves. This is because the wool I used for Judah's tunic is a bit on the heavy side and would work really well as an over-tunic or surcote. In hot weather he can wear the short sleeves with his linen shirt as a cooler option than wearing something with long, tight sleeves. In cooler weather he can layer the short sleeve tunic over a long sleeve one for additional warmth.
The cut of the sleeves is just like a regular sleeve, only shortened. I flared the side seams out a bit for a more funnel-shaped sleeve, though for David and Malachi's sleeves I left the sleeves more fitted and plain.

The sleeve seam is sewn. The sleeve is positioned in the arm hole so that the seam goes up the back of the arm. I finished the bottom of the sleeve with a strip of linen as a facing.


The finished tunic:

I finished the seams by simply sewing them flat to the garment with an uneven running stitch (short on the outside, longer on the inside.) Usually I turn under the raw edge of the seam before sewing it to the garment but in this case, the wool was so thick that doing so would have made very bulky seams! So I just left the edges raw and stitched them down. I did this with David's blue wool over-tunic a few years ago and it has worn just fine with the finishing being done in this way.

Here is what the seam finish looks like from the inside (not as nice and pretty as having turned-under seams, but still, much less messy than leaving the seams not finished at all!)

Anne's pink linen cote (to use the term used by Sarah Thursfield in The Medieval Tailor's Assistant) is made to the same pattern, only without the center gores and with long sleeves instead of short ones.
And here is one photo from the Faire showing all the children together! I have a few more I will post later.

Love,
Sarah


