

Wednesday, November 11, 2015
Gathering
Pretty sure that gathering and attaching the skirt took longer than sewing the rest of the dress. It's finally done, except buttonholes. I will do those tomorrow. For now, I have a book to read and a baby to cuddle!


Sunday, November 8, 2015
A Regency Bodice
It can be a very bad thing to be a cheapskate. I admit I am one, even when I don't need to be. Making things last as long as possible gives me some weird victorious delight. This can be a good thing (money, food, etc) or an unnecessary bad thing (toilet paper, for example).
I try to make fabrics go as far as possible too. So, for my white gown I ordered yardage and put it up for a while. I made many sketches of dress designs. In my fashion plate only the front skirt is shown so I had some freedom in choosing bodice and sleeve style.

Finally I settled on a design and cut out my bodice. I then cut out the skirt panels and was left with just a few inches of fabric, to my dismay. What happened?! I finally realized I had ordered a yard less of fabric than I thought. I then remembered that I had decided to just make a petticoat instead of a whole dress, to be economical.

Since I had already cut out and mostly constructed the bodice I determined to make sleeves somehow. I had to piece the finished sleeves but they are sleeves nonetheless! They are based on short, fitted sleeves from a 1815 dress in Costume in Detail.

The skirt is almost ready to attach. Its been a bit slow going since I am sewing this all by hand. The seams that will take some strain are felled and the skirt seams finished by turning the seam allowance in towards each other and whipping them loosely.

Sarah
Tuesday, November 3, 2015
A Regency Chemisette for Vernet
It is November! And that means Thanksgiving and also Vernet! November is the last month to finish up the projects for the fashion plate collection, so I am busy tying up loose ends (figuratively and literally!) and am getting pretty excited about everyone's big reveal next month.

I will not hide the fact that when I was invited to join in this project I chose what was perhaps the least visually exciting plate. I don't like a lot of fancy details, in general, and gravitate toward severely plain. (Just take a look at my modern wardrobe if you don't believe me. Almost everything is solid black, brown, gray and blue.)
But the more I delved into my project the more I realized that there are still some pretty quirky details.
I recently finished up my chemisette. I spent a while trying to figure out the hem of the chemisette ruffles. Then a while trying to figure out how to make the ruffles. Plus the chemisette. I've never made one before, because they are too fussy looking for my taste.
The "B" 1800-1825 chemisette in Janet Arnold's PoF 1 was pretty helpful in finally clueing me in on how to put this together. I ended up draping a little partial bodice with a 1" stand collar.

The ruffles were made and attached separately. There are two ruffles and the edges are vandyked. This seems to have been a popular shape for the edges of ruffles and trimming in the 18-teens. I hemmed them with a small hem.

The points on the ruffles were staggered.

Then the ruffles were gathered and whipped to a narrow tape as per instructions in PoF 1.

This was a very long and tedious process.

Finally the ruffles were done and ready to be attached! Here you can see that the ruffle is wider in the center than at the sides.

One ruffle was stitched to the top of the neckband, and the other at the bottom of the neckband.

Tapes were sewn to the neck to tie closed and run through the hem to tie at the waist. All done.

I feel a little ridiculous in it, but it does add to the proper look. The fabric is a fantastic cotton organdy that holds its shape wonderfully, even without starch. I sort of love this fabric!
So that's the chemisette.
Sarah

I will not hide the fact that when I was invited to join in this project I chose what was perhaps the least visually exciting plate. I don't like a lot of fancy details, in general, and gravitate toward severely plain. (Just take a look at my modern wardrobe if you don't believe me. Almost everything is solid black, brown, gray and blue.)
But the more I delved into my project the more I realized that there are still some pretty quirky details.
I recently finished up my chemisette. I spent a while trying to figure out the hem of the chemisette ruffles. Then a while trying to figure out how to make the ruffles. Plus the chemisette. I've never made one before, because they are too fussy looking for my taste.
The "B" 1800-1825 chemisette in Janet Arnold's PoF 1 was pretty helpful in finally clueing me in on how to put this together. I ended up draping a little partial bodice with a 1" stand collar.

The ruffles were made and attached separately. There are two ruffles and the edges are vandyked. This seems to have been a popular shape for the edges of ruffles and trimming in the 18-teens. I hemmed them with a small hem.

The points on the ruffles were staggered.

Then the ruffles were gathered and whipped to a narrow tape as per instructions in PoF 1.

This was a very long and tedious process.

Finally the ruffles were done and ready to be attached! Here you can see that the ruffle is wider in the center than at the sides.

One ruffle was stitched to the top of the neckband, and the other at the bottom of the neckband.

Tapes were sewn to the neck to tie closed and run through the hem to tie at the waist. All done.

I feel a little ridiculous in it, but it does add to the proper look. The fabric is a fantastic cotton organdy that holds its shape wonderfully, even without starch. I sort of love this fabric!
So that's the chemisette.
Sarah
Thursday, October 29, 2015
Historical Sew Monthly Challenge #10 - Sewing Secrets
Apologies for an unplanned absence! October has turned into a very busy month (though pleasant and quite beautiful) and blogging has taken a backseat. It has been a month filled with trips, school projects, visits to the river to see the fall foliage, David's 9th birthday and time spent with friends. And sewing! I finally finished my regency underthings and photographed them *just* in time for the Historical Sew Monthly Challenge #10.
Sewing Secrets.
This was a hard one. Although, for my stays, kind of obvious. What can be secret about stays? The busk! It isn't seen, although very necessary to get the correct lift and separate look of the regency era. And a busk was an ideal place for a lover to inscribe a secret message to his sweetheart. When worn in the garment, his message was against her heart. (or supposedly so) ;) How romantic! Right? So those are the secrets of my stays.

They went together quickly and easily with the Laughing Moon pattern. This is the same pattern I have used the past six years, with modifications made to my master pattern every time I use it. The boning and cording placement is my own.

It's made of two layers of lightweight cotton twill, with cotton Peaches n' Cream cord used for the cording. Zip ties for the boning. I made many eyelets by hand to lace it with, but the ribbon I used for these pictures was too short to lace through every eyelet so for now it is laced through every other eyelet.

Since my bust size is still fluctuating since sweet baby Rose is still exclusively nursing, the cups are a little small. Hopefully once she is weaned my size will return to normal and the cups will fit better. Still, I am happy with the shape. I think in these pictures the corset is kind of sitting a bit low. Moving the whole thing up a bit will help with bust position. I just didn't have time to properly evaluate the way it looked before having Judah snap a few pics yesterday afternoon.
I hope to post more details soon, but for now, away to life and adventure! ;) Have a wonderful Halloween weekend, dear readers!
Love to all,
Sarah
What it item is: 1800-1820 corded stays
The Challenge: Sewing Secrets
What's the Secret: A message from my beloved one inscribed on the busk wink emoticon
Fabric: Cotton twill
Pattern: Laughing Moon
Year: 1800-1820
How historically accurate is it: The shape and cut is good, as is the cording and fabric, but I sewed most of it on the sewing machine and used zip ties for boning.
Hours to Complete: Maybe 10
First Worn: For pictures, yesterday
Total Cost: Under $15
Sewing Secrets.
This was a hard one. Although, for my stays, kind of obvious. What can be secret about stays? The busk! It isn't seen, although very necessary to get the correct lift and separate look of the regency era. And a busk was an ideal place for a lover to inscribe a secret message to his sweetheart. When worn in the garment, his message was against her heart. (or supposedly so) ;) How romantic! Right? So those are the secrets of my stays.

They went together quickly and easily with the Laughing Moon pattern. This is the same pattern I have used the past six years, with modifications made to my master pattern every time I use it. The boning and cording placement is my own.

It's made of two layers of lightweight cotton twill, with cotton Peaches n' Cream cord used for the cording. Zip ties for the boning. I made many eyelets by hand to lace it with, but the ribbon I used for these pictures was too short to lace through every eyelet so for now it is laced through every other eyelet.

Since my bust size is still fluctuating since sweet baby Rose is still exclusively nursing, the cups are a little small. Hopefully once she is weaned my size will return to normal and the cups will fit better. Still, I am happy with the shape. I think in these pictures the corset is kind of sitting a bit low. Moving the whole thing up a bit will help with bust position. I just didn't have time to properly evaluate the way it looked before having Judah snap a few pics yesterday afternoon.
I hope to post more details soon, but for now, away to life and adventure! ;) Have a wonderful Halloween weekend, dear readers!
Love to all,
Sarah
What it item is: 1800-1820 corded stays
The Challenge: Sewing Secrets
What's the Secret: A message from my beloved one inscribed on the busk wink emoticon
Fabric: Cotton twill
Pattern: Laughing Moon
Year: 1800-1820
How historically accurate is it: The shape and cut is good, as is the cording and fabric, but I sewed most of it on the sewing machine and used zip ties for boning.
Hours to Complete: Maybe 10
First Worn: For pictures, yesterday
Total Cost: Under $15
Saturday, October 10, 2015
October
Already we are approaching the middle of October! Cool nights, early evenings and mornings with chilly sunshine. The days are rather short now and the dark comes quickly. So passes summer into golden memory. Life is a breath.

I hope to soon have a post about some of the items I've been working on for a very special project. I can't say that much about it since it is to be revealed as part of a group at the end of the year, but vague updates are allowed! If you haven't heard of the Vernet's 1814 Merveilleuses and Incroyables project, that is recreating fashion plates from 1814, then check out the facebook page here!

In the meantime, this week I've worked on filling a few orders and making a few new items for the shop, including some boys wool caps and a velvet hood.


I hope to soon have a post about some of the items I've been working on for a very special project. I can't say that much about it since it is to be revealed as part of a group at the end of the year, but vague updates are allowed! If you haven't heard of the Vernet's 1814 Merveilleuses and Incroyables project, that is recreating fashion plates from 1814, then check out the facebook page here!

In the meantime, this week I've worked on filling a few orders and making a few new items for the shop, including some boys wool caps and a velvet hood.


Anne and I are working together on her 1860's dress, but it's coming along more slowly than I would like. There just aren't enough hours in the day! The good thing is that there is always something to keep busy with!
Monday, October 5, 2015
Rose's White Baby Gown
Along with the chemises and drawers for her and the older babies, there was enough of my garage sale cotton sheet left to make Rose a baby gown. (And there is still some of that fabric left. Honestly that's the best buck I've spent for quite a while!)


It is made in the common style of the era with sleeves set in raglan style. Easy, comfortable and quick. With machine sewing most of it but hand sewing the hems and buttonholes and facings this dress took four hours to make, tops.

The skirt is long enough to go past her little feet but not terribly long, since she is an older infant and would soon be in shortened dresses. If this dress still fits her next spring (it may, since I made it large) I can take up the length in tucks so she can wear it as she toddles around.

It has one button at the top of the bodice back and one at the waist.

She loved wearing it since she is at that age where every thing has to be grabbed and tasted. Skirts to grab! Yay! Skirts to stuff in her mouth! (and yes, she was entranced by the weeds that she could grab and taste and objected passionately when I removed her from their vicinity.)

For these pictures, though, she wasn't all that happy since she had just woken up. Check out that face. . .haha. ;)

The little cap was one that her brother Malachi had worn in his infancy. It was a tad small for her round little head but I can make another one like it whenever I have a few spare moments.

Yay, a smile!!

Another unenthusiastic face. :)

Pretty blue eyes.

Wednesday, September 30, 2015
Historical Sew Monthly Challenge #9 ~ Brown
I did it! I finished my dress in time for the Historical Sew Monthly challenge #9. The dress was completed earlier this month but I didn't get a chance to take pictures until today. So, I present to you, my entry for "Brown".

What the item is:
This is a basic 1860's style day dress, made in a less dressy fabric and suitable for daily wear/work. It has a tucked bodice, pleated skirt with gauged back section and one piece coat sleeves.
The Challenge:
Brown. The fabric is pink with brown stripes.
Fabric:
Striped cotton for the main fabric and white cotton for the bodice lining. For the hem facing, a cotton print in red and white.
Pattern:
My own. The bodice is draped, the sleeves are drafted and the skirts are 4 rectangular panels.
Year:
1860-1865-ish.
Notions:
Hook and eyes. Cotton cord for piping at the neck, armscyes and waistband.
How historically accurate is it?
Very. I used the machine for some parts but the areas that would have been stitched by hand in the 1860's are stitched by hand here. (Setting the skirts, sewing down the facings, attaching the hook and eyes, etc.)
Hours to complete:
I really don't know. Maybe 12.
First worn:
Today, for pictures.
Total cost: $25 or so for the fabrics.


What the item is:
This is a basic 1860's style day dress, made in a less dressy fabric and suitable for daily wear/work. It has a tucked bodice, pleated skirt with gauged back section and one piece coat sleeves.
The Challenge:
Brown. The fabric is pink with brown stripes.
Fabric:
Striped cotton for the main fabric and white cotton for the bodice lining. For the hem facing, a cotton print in red and white.
Pattern:
My own. The bodice is draped, the sleeves are drafted and the skirts are 4 rectangular panels.
1860-1865-ish.
Hook and eyes. Cotton cord for piping at the neck, armscyes and waistband.
Very. I used the machine for some parts but the areas that would have been stitched by hand in the 1860's are stitched by hand here. (Setting the skirts, sewing down the facings, attaching the hook and eyes, etc.)
Hours to complete:
I really don't know. Maybe 12.
Today, for pictures.
Total cost: $25 or so for the fabrics.


Monday, September 28, 2015
Anne's Stays and Hooped Petticoat
Anne wasn't that enthusiastic about her chemise or drawers, but once I had her stays fairly started and kept calling her down for fittings she became more interested. And when she tried on her tiny hoop, she was hooked. "Look at me twirling!"

I really hate making toddler/child stays but did so for the simple reason that it does extend wearability. Because stays make the waistline adjustable. The skirts button to the stays and you can place the buttons a little higher or a little lower as needed.

So I made these a bit on the long side. I can move the buttons downwards about an inch if I have to next spring and coupled with the slightly-on-the-long-side-already length, I hope the stays will work for her most of next year.

They are minimally corded with a buttoned back and buttoned straps. The straps can be lengthened too by moving the buttons downwards as needed.

The hoop is so simple. Just two 1/2" steels sewn into the hem and a tuck of a plain petticoat. It's a modified version of my own hooped petticoat, which is copied from an original depicted in Costume in Detail, that has five 1/2" steels sewn into tucks towards the bottom of the skirt. Since she is so little she does not need five steels and I think two will work nicely, with a full petticoat or two on top.


I made the waistband out of plain white cotton and it buttons to the edge of the stays with six buttonholes. That's it! So easy.

Of course, shortly after taking these pictures she decided to take a spoon and splash in a skillet of cooking oil so, already, these have had to be washed. . .thankfully cotton washes up pretty easily! I'm sure these will have plenty of stains and wear and tear by the time she outgrows them. But hopefully they will still be in good enough shape to pass down to Rose.


I really hate making toddler/child stays but did so for the simple reason that it does extend wearability. Because stays make the waistline adjustable. The skirts button to the stays and you can place the buttons a little higher or a little lower as needed.

So I made these a bit on the long side. I can move the buttons downwards about an inch if I have to next spring and coupled with the slightly-on-the-long-side-already length, I hope the stays will work for her most of next year.

They are minimally corded with a buttoned back and buttoned straps. The straps can be lengthened too by moving the buttons downwards as needed.

The hoop is so simple. Just two 1/2" steels sewn into the hem and a tuck of a plain petticoat. It's a modified version of my own hooped petticoat, which is copied from an original depicted in Costume in Detail, that has five 1/2" steels sewn into tucks towards the bottom of the skirt. Since she is so little she does not need five steels and I think two will work nicely, with a full petticoat or two on top.


I made the waistband out of plain white cotton and it buttons to the edge of the stays with six buttonholes. That's it! So easy.

Of course, shortly after taking these pictures she decided to take a spoon and splash in a skillet of cooking oil so, already, these have had to be washed. . .thankfully cotton washes up pretty easily! I'm sure these will have plenty of stains and wear and tear by the time she outgrows them. But hopefully they will still be in good enough shape to pass down to Rose.


Friday, September 25, 2015
Simple Toddler Chemise
Towards the beginning of summer I started some mid-19th century undergarments for my Ben-Boy but alas I fell away from completing them. This week I finally pulled out his chemise and cut a larger one to sew up for Anne. I finished them today and am not without hope that this evening I will be able to sew up some drawers for each of them. Gotta continue to make progress. The ball is rolling. Isn't he cute?


This style is super super simple. It's based on a rectangle and cut all in one piece and the neck is lightly gathered into a neck band. It really can't get much easier! Here's a very rough diagram of how I cut these:

Earlier this year I found an incredibly soft, luxerious, heavy white cotton sheet at a garage sale. It was $1 and queen sized so I was sure there would be enough fabric there to make some undergarments for the babies. The oh-so-soft cotton would feel so nice against their skin. These are made from that sheet and there's still an incredible amount left over, plenty for drawers and a set of undergarments for Rose, and then some.


My oldest three sons were very accustomed to wearing garments like these since back when they were little we often attended reenactments. This was Benjamin's first time wearing anything like a dress and he thought it was hilarious.

It didn't stop him one bit from quickly finding some rocks and sticks to scratch in the dirt.

He moves fast, so it was hard to get many pictures.

He will be getting a bodiced petticoat to go over his undermost things, but Anne will have stays, a little hoop and a button-on petticoat. She is very interested in the hoop. Maybe I can get those knocked out this weekend. It's supposed to rain, so will be very pleasant for sewing.
Tuesday, September 22, 2015
1860's Work Dress Progress - Skirt and Finishing
The dress itself is done. I ended up sewing the hooks on late last night while baby Rose lay next to me on her blanket. Out of the fourteen hook and eyes to sew on, I got twelve done before she decided to start screaming. I count that a success. ;)

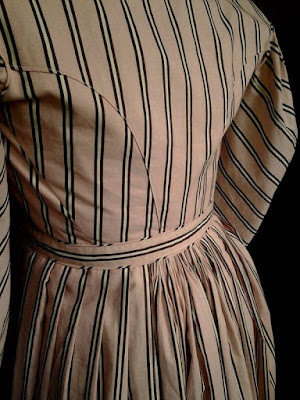


I still haven't made a collar, or cuffs or undersleeves. I have a few other things I need to finish first but a collar is such a simple thing to make, it shouldn't be too long before I have time to make one. I may or may not make the cuffs. They aren't strictly necessary and if I will be rolling up my sleeves most of the time anyway, not extremely useful. But the collar is a must have.

I decided to pleat my skirt but left a little section at the center back unpleated. I cartridge pleated that area. This is sometimes seen on original dresses. It gives you a bit of wiggle room if your pleats aren't perfectly calculated and for me, I like it because I am not sure when I will be making another 1860's dress and this method shows what both knife pleating and cartridge pleating look like.

The skirt was attached with the usual method of whipping to the edge of the bodice waistband, just under the piping. My dress won't close on the dressform but you can get a general idea of what it the opening looks like.

The dogleg closure fastens the skirt at the side front and the bodice at the center front.

I also made a pocket in one of the side front seams. I usually don't put pockets in the skirt but I thought it would be a very useful feature!

For the hem facing I used up the last bit of fabric I had left over from the 1810's dress. Not as wild a hem facing as I really wanted, but better than plain white! And it was white on one side, so didn't shadow through the hem. Thank you for the suggestion, Veysketh!

I tried on the dress real quick and am really happy with how it has turned out. The hem just brushes the top of my feet so it will be able to be worn with just petticoats or with a small hoop. It felt so freaking awesome! One just settles comfortably into the familiar feel of it all. Yep, the 1860's will always be home. Even if I do like styles from other eras a lot better! It's me.
Subscribe to:
Posts (Atom)