Sunday, July 7, 2013

A Bluebird Regency Gown for Anne

I recently finished a project for a friend and had some of this fabulous printed bluebird organic cotton left over. It was so cute I just had to use it to make a dress for the baby but it was hard deciding what style to make, since the print is really pretty modern. I kept shuffling through my small collection of modern patterns but nothing really jumped out at me.

In the end I decided to combine historical and modern, so I used the Sense and Sensibility Girls Regency Gown Pattern to create this little dress for Anne.

I completely love how it came out. It is a bit strange to see the familiar regency lines in such a modern print but I think that makes it fun! It appeals to both my historic-loving friends as well as those who have more modern fashion sense so it combines the best of both worlds.

And, as always, the Sense and Sensibility pattern was totally wonderful to work with and resulted in a fabulous garment with no frustrating setbacks or fitting difficulties. Sometimes, yeah, working with a pattern is easier than trying to make one on your own.
Our Very Own Stands-With-A-Fist. She's SO close to walking. . .

This was size 2. I used size 1 to make Anne's hobbit dress last winter. While that dress still fits her comfortably I wanted this dress to fit as long as possible so I made it a bit large on purpose.

I deviated from the pattern a bit. The instructions call for gathering or pleating the skirt evenly all around the waist. I decided to pleat the skirt as I do my own regency dresses - with 2 pleats at each side front, and then heavily pleated in the back waist. I like the lines this gives to the dress - a bit A-line, but without having to cut the skirt in an A-line shape. The skirt is 2 rectangles of fabric, pleated to fit, and the hem is about 64". I also added 2 tucks to the hemline, just because the skirt came out too long. She's fully 21" from shoulder to ankle so that doesn't give me a lot of space for skirt length! But the tucks really help the skirt pouf out so I'm glad I added them.

The other modification was the sleeves. I didn't have *quite* enough fabric to cut the full puff sleeve from the pattern so instead of cutting the curved bottom line on the sleeve, I made it cut straight across. This still gives a great puff, though!

I had to cut the front bodice in 2 pieces due to fabric limitations, so I added a band of coordinating green cotton (also left over from my friends' project) down the front of the bodice to hide the seam. I sewed a band for a faux "waistband" at the bottom of the bodice out of the same coordinating print. I love how it came out. It definitely accentuates the empire waistline. Sometimes that style feature gets lost when a dress is simply made with no trim and relatively un-fitted.

The best part about making this dress was having my little girl with me while I sewed it up. It went together in an afternoon and she loved playing with the scraps and pointing to the bright blue birdies on the fabric. When the dress was finally done I held it up so she could see it and she folded it into her arms and screamed with glee. It was a bit heart melting. ;) She knew it was for her.

So Anne's first regency gown! I hope this is just the first in a long line of regency gowns we will make together over the coming years. Couldn't resist sharing this last one of Anne and her daddy today, talking together after lunch. Love them!

Love,
Sarah

Saturday, June 29, 2013

Making Judah's Medieval Tunic

So, here is how I made the boys tunics. (In passing, I realized that in my last post I referred to these as tunics, gowns, cotes, etc. . .sorry! That could potentially be hugely confusing. I suppose "outergarment" may suffice as a general description but on Marc Carlsons' site Some Clothing of the Middle Ages garments like these are referred to as Kyrtles/Cotes/Tunics/Gowns.)

Marc Carlsons' site is a fantastic resource. It has drawings and often detailed descriptions about original clothing that has been found from this period. The particular garment that inspired these tunics is Herjolfsnes 44, which was originally worn by a young girl.
Some Clothing of the Middle Ages -- Tunics -- Herjolfsnes 44, by I. Marc Carlson, Copyright 1997 This code is given for the free exchange of information, provided the Author's Name is included in all future revisions, and no money change hands- 

I was drawn to this style because of the very sensible and economical cut, the loose fit that accommodates rapidly growing children and the ability of this style to be made quickly. Which is, usually, (and unfortunately) a priority for me since I often put things off til the last minute and then scramble to get them done as quickly as possible. 

Almost three years ago I made this style for Malachi from a lightweight yellow twilled wool:
The style is basically two rectangles for the body, two triangles for the sides with squared-off points, and two triangles for the center front and center back gores. And sleeves. 

It fit him for a long time. The only problem I had was getting his head to fit through the neck opening. Now, the neckline is a bit torn at the center front where his head broke several threads the last time I forced it over his head. I will need to make some repairs to it before Anne can wear it. (it is still rather too large for her.) 

Back then, I made the same style for David and Judah, only leaving out the center front and center back gores. This was because I simply lacked time to put the gores in. I always intended to go back and put the gores in at some future point. . .but I never did. The center-goreless-style is one that is illustrated for young children in Sarah Thursfield's The Medieval Tailors Assistant, though, so I figured just side gores were okay, though they didn't gave the same amount of graceful fullness to the skirts.

This time around I went with the same style, only making the necklines keyhole, with a rather fitted neck and a center front slit. I made all 3 tunics in the space of about 4 days, including hand finishing of the seams, (except Little David's, though I could have finished his seams if I hadn't gotten very sick the day before the Faire!) so I was once again very pleased with how plain and straightforward this style is to put together.

To begin with, I measured the child (in this case, Judah) from shoulder to shoulder across the front. I added 1" to this measurement and that was the width of my body panels. I measured from the top of Judah's shoulder to the desired hem length (about mid calf) and added 3" for seam allowance and a hem. I used that for the length of the body panels. I cut two body panels and at the top of the panels, cut the shape for the shoulders and neckline.

For the side gores, I cut two rectangles of fabric the same width as the body panels and long enough to reach from Judah's under-arm to the hem. I pressed the rectangles in half and angled the sides so I ended up with a triangular piece that was narrow at the top (I made this narrow width the width necessary to go across the bottom of Judah's underarm), and wider at the bottom.

Here you can see the main body panels laid out, with the side gores laid next to them:

For the center front and center back gores, I cut a rectangle of fabric the same width as the body panels, and long enough to reach from Judah's waist to the hem. From one rectangle of fabric I was able to cut a full triangle and two half-triangles. The full triangle can be used as-is for a gore, and the two half ones seamed together to create a full triangle for the other gore.

Then it was time to sew!

I first finished the center front slit in this way:

I cut a rectangle of plain linen as long as the desired slit length, plus a bit extra.

I pressed this strip in half to find the center. I pressed the front body panel in half to find the center, and laid the linen on top of the wool, matching centers.

I secured the linen to the wool with pins.

And began to stitch. I used the presser foot as a guide for the seam, lining up the presser foot with the center line.


Towards the bottom, I began to narrow this seam and started to guide the needle to the center line:

Then leaving the needle in the fabric, I lifted the presser foot, swiveled the fabric and began to sew up the other side of the slit:


The finished seam:

I carefully cut along the center line, to the very point of the slit, being careful to not cut the sewing threads.


The linen was folded to the inside and a narrow hem pressed under all around.

The linen was secured in place with slip stitches (by hand) and voila!

A neatly finished slit.

The next step was inserting the center gores. I began with the front gore and decided to use the full triangle as the center front gore. I cut a slit 1" shorter than the length of the gore on the front body panel:

The gore was pinned into the slit opening, right sides together. To accommodate the point of the gore, the seam allowance on the main body panels narrows as the tip approaches, though the normal seam allowance is retained on the gore itself: (it sounds way way more complicated than it really is!)

This makes a nice, smooth tip on the finished gore - no puckers! Here is a (blurry) picture of the seam allowance of the main body panel pinned to the gore. . .you can see how there are just a few threads that are sewn to the gore at the top of the slit.

The finished gore, after being sewn in, from the right side:
After sewing this particular gore in, I realized I sewed it wrong side out. I had to tear it out and resew it in, so I did get a bit of fuzzing at the tip, which you can see in this pic. 

And the wrong side:

This method of putting in gores definitely requires finishing the seam or it is quite easy for the tip of the gore to tear out. I usually fold under the seam allowance of the gore and stitch it down to the main body panel, from the inside, and then reinforce the tip with whip stitches on the outside. I have never had a gore tip pull out for me during wear using this method.

Then it was time to do the same thing with the back center gore! I sewed the two half triangles together (this results in a slightly shorter, narrower, gore than the full-triangle one, but that is fine) and then sewed it in to the back gore slit the same way!

Here are the two body panels with the gores sewn in:


Then I sewed the front to the back at the shoulder seams:

And sewed the side gores to connect the body panels at the sides.
Next time I think I will make the side gores 1.5 x the width of the body panels, or possibly 1.75 instead of the same with as the body panels. 

To finish the neckline, I cut a narrow strip of linen and sewed it with a narrow seam to the neck, right sides together.

Because linen is naturally a bit elastic-y, it was easy to press it to the inside, and narrowly hem it to the wool.

Try on time! It looks a bit like a shapeless bag but will look better once the sleeves are in and the hem is sewn.

For the sleeves, I decided to go with shorter, looser sleeves. This is because the wool I used for Judah's tunic is a bit on the heavy side and would work really well as an over-tunic or surcote. In hot weather he can wear the short sleeves with his linen shirt as a cooler option than wearing something with long, tight sleeves. In cooler weather he can layer the short sleeve tunic over a long sleeve one for additional warmth.

The cut of the sleeves is just like a regular sleeve, only shortened. I flared the side seams out a bit for a more funnel-shaped sleeve, though for David and Malachi's sleeves I left the sleeves more fitted and plain.

The sleeve seam is sewn. The sleeve is positioned in the arm hole so that the seam goes up the back of the arm. I finished the bottom of the sleeve with a strip of linen as a facing.

Sleeves are in!

The finished tunic:

I finished the seams by simply sewing them flat to the garment with an uneven running stitch (short on the outside, longer on the inside.) Usually I turn under the raw edge of the seam before sewing it to the garment but in this case, the wool was so thick that doing so would have made very bulky seams! So I just left the edges raw and stitched them down. I did this with David's blue wool over-tunic a few years ago and it has worn just fine with the finishing being done in this way.

Here is what the seam finish looks like from the inside (not as nice and pretty as having turned-under seams, but still, much less messy than leaving the seams not finished at all!)

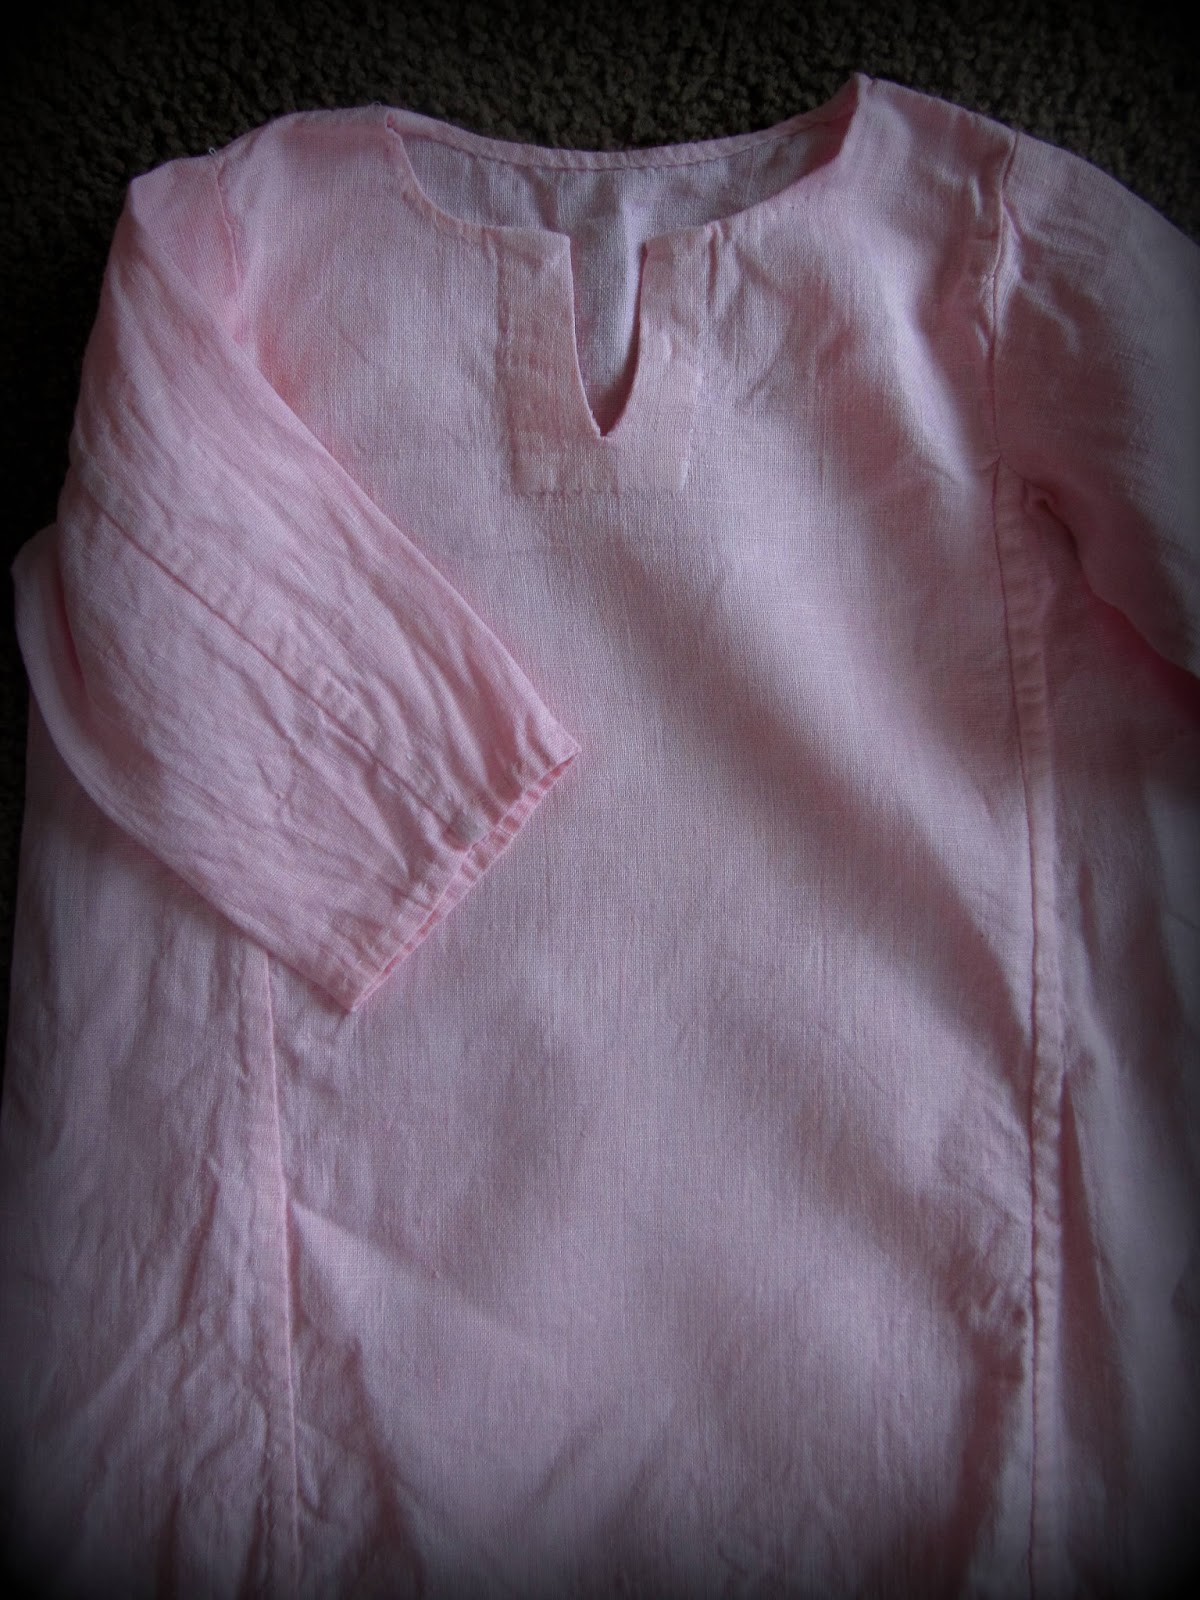
Anne's pink linen cote (to use the term used by Sarah Thursfield in The Medieval Tailor's Assistant) is made to the same pattern, only without the center gores and with long sleeves instead of short ones.

And here is one photo from the Faire showing all the children together! I have a few more I will post later.

Love,
Sarah

Tuesday, June 25, 2013

Finished Woolen Medieval Tunics

I took a bunch of photos at the Faire this past weekend and will hopefully get the chance to share some later this week. For now, here are two of my favorite pictures from the day! I was able to finish the boys' new medieval gowns just in time. I didn't have time to finish the seams of little David's tunic but I will do that before I put these away to store for our next event. I will do a post about their construction later (and I took step by step photos for a mini-tutorial of sorts) but for now, this is what they look like! Since the weather was so hot I decided to make their wool gowns with shorter, looser sleeves so that later in the fall they can wear them as surcotes over a more fitted, long-sleeved tunic.

I was afraid the baby would get too hot in Malachi's old yellow wool gown (it's pretty much felted, since I had to wash it after Malachi first wore it and dumped stew all down the front!) so the day before the Faire I made her a very quick and simple linen cote. I know linen as outerwear is not the most authentic choice, but it got her by without her getting heat rash and she can use it as a modern top as well since I know it will not fit her long. I dyed it pale pink to contrast with her white linen shirt underneath.

My wool kirtle needs to be seriously addressed before our next event. It may be time to replace it, though I can't bear the thought of just retiring it permanently. It needs to be majorly overhauled though. But, that is a topic for a separate post. ;)

Love,
Sarah

Tuesday, June 18, 2013

A Dorothy Dress

This week I am busy finishing up the boys' new medieval outfits for the Olde Enligh Faire this coming weekend but wanted to share a recently finished project before it gets buried under the influx of new projects as time goes on in this busy summer reenacting season.

That was a long sentence. Anyway.

I had an opportunity recently to sew up a costume for a highschool drama group in our church. My sister graduated highschool last month and she and her friends are performing at an upcoming youth convention at the end of June. It will be their last year being able to participate, so it is kind of special.

Their dramatic presentation is inspired by the story The Wizard of Oz. My sister is playing the part of the Tin Man and when one of her friends mentioned needing a Dorothy dress I begged her to let me make it! I have loved the Wizard of Oz since I was a child and have always dreamed of sewing up a dress like the one Judy Garland wears as Dorothy in the move adaption of the novel.

It was very fun researching and making this dress. I was able to find some information about the real dresses Judy Garland wore in the movies. I guess it helps that one of the original gowns was recently sold, so there was a lot of publicity about it. My version is not an exact copy but I wanted the general feel and look of the one worn in the movie, sized to fit a different girl with a modern figure.

It was really simple to construct. It is not a complicated outfit at all. The hardest part was the blouse, since I have never made a blouse that gathers into the neck before. I ended up just draping a basic jewel neck bodice on my sisters' friend and then slashed and spread the neckline from the neck to the hem to get some excess width to gather back into a simple band collar. The sleeves were basic puff sleeves with simple band cuffs. I could not find light blue rick rack to trim the collar and cuffs with so we settled for a darker blue rick rack. (I got everything quickly at Wal Mart, so, obviously, my choices were limited.) The blouse is made from a lightweight poly/cotton blend fabric. The blouse has a short placket at the back and the collar fastens with a single snap.

The jumper dress is made from poly/cotton blue checked gingham. The bodice is lined and interlined with firm white cotton for stability. There is very little shaping to the bodice - basically a tube with side seams that slightly shape the waist. The bodice is also cut a bit higher in the front than in the back, but otherwise, it's pretty much a  rectangle! The straps, bodice binding and waistband are cut on the bias, but backed with firm white cotton to prevent stretching.

The straps are simply topstitched to the finished bodice and I sewed on large white buttons at the ends in both the front and back. The skirt is 3 A-line panels, gathered to fit the waistband. I used the whole width of the fabric for the width of the hem of the A line panels so the bottom of the skirt is quite full. Perhaps a bit fuller than the original movie dress, but I'm fine with that. The girl who will wear this dress is taller than Judy Garland was, so it all works!

The hem is finished with a wide hem facing. I also realized at the end of making this that the original dress has a bias band stitched around the lower portion of the skirt. I had just enough fabric left to cut a bias band to trim the skirt with. I like how it looks! You can't really see it from a distance but still, it makes me happy to know it's there. :)

I had to modify the back a bit. For some reason the bodice came out a tad tight at the top. (I am still not sure how that happened. . .) so I added a bias triangle of fabric, finished and then topstitched to one side of the back opening. The other side of the bodice overlaps and closes with hook and eyes.

It was such a great project to work on! And it makes me happy I can do something to help the drama team in some small way. I hope they have a lot of fun!

Back to 14th c. sewing!!

Love,
Sarah