Thursday, September 17, 2015

1860's Work Dress Progress - Bodice

I have been slowly working on my dress. I pulled out my old pattern, cut a mock up and waited a long time before fitting it over my corset. For some reason it seems like so much work to put on the corset. It was done at last, though, and the bodice was fitted.

Yep, that's an unmade bed in the background, and my child playing with her baby dolls on it. Anyway. The fit was pretty good but I had to do a bit of finagling with the length. The back needed to be lengthened quite a bit and a little bit of length taken off the front to make the waist even all the way around. I also had to raise the neckline a little bit and take a half inch off each side seam. But at last the details were worked out and I cut out my bodice fabric and lining and put it on inside out to pin in the darts. 

Darts are terribly hard to pin evenly. In my experience there is just no other way to do darts with extremely fitted bodices except to pin directly on the body. I've tried fitting mock ups, tracing the dart lines and transferring them to paper but they always come out somewhat off. My method is not that great since pinning them with the bodice inside-out results in the darts switching sides once the bodice is finished but it's the lesser of the various dart-evils. 

After pinning in the darts I sewed them imperfectly with the eyeball method. Then I checked the waist length one last time and sewed on a waistband. I had barely enough fabric to eek out a waistband and the littlest scraps were pieced for piping, but it was done. 

I had just barely enough piping to do the neckline and armscyes, but those got done too. Relief! 

For sleeves I decided very basic one piece coat sleeves were the most economical choice, fabric-wise. It came out to be that cutting them on the bias took less fabric than cutting them straight. Who knew? So I have bias sleeves and I like how they drape very much. Here is the bodice so far - all ready for the skirt to be whip stitched onto the bottom of the waistband! (the skirt, however, is not even sewn together yet.) 

The finished self-facing on the front opening, the darts and the waistband lining: 

Curved back tucks: 

View of the inside bodice: 

I have 4 full panels left to make a nicely full skirt so that is next. The fabric is pretty lightweight so I'm not sure what to use for a hem facing but I want something fun - the problem is something fun shadows through the outer fabric! I may have to go with boring white. 

Then collar, cuffs or undersleeves, and fastenings. 

Thursday, September 10, 2015

New Baby Hobbit Dress

Over the last couple of years I watched, with anticipation and increasing excitement the release of three new movies by Peter Jackson depicting The Hobbit  by J.R.R. Tolkien. I was really excited to see the costumes and although the movies left me less than satisfied (yeah. . .to put it mildly. . .) I really enjoyed the costumes worn in the scenes from Hobbiton (and Thranduil was awesome. Oh, so awesome).

Actually all the costumes were pretty good. The dwarves, the Laketown residents, the attire of the elves. Beorn. And yes, that sentence was purposely one word. Beorn deserves his own sentence. ;) It was interesting to see how the costume designer made the hobbit costumes look different from those worn in the original Lord of the Rings trilogy. Since The Hobbit is set earlier, the costumes reflected the difference in time and had a more 18th century vibe. The clothing was also more diverse, instead of the rather standard chemise-bodice-petticoats outfits worn by women in The Lord of the Rings. 
girls costumes from The Hobbit
Awhile ago I made some baby dresses based on hobbit costumes from The Lord of the Rings. I just finished up a new one that is similar but has some design differences that are inspired by the costumes in The Hobbit. 

I used the same pattern but made the stomacher a bit wider, and made the overskirt split down the front to reveal the under petticoat. 

The back is drawn up as a nod to the polonaised gowns of the late 18th century. To keep with the earthy, organic feel I used natural cotton cord for this instead of ribbons. 

This dress was a complete pain to sew because of the material used. Brocade! Upholstery brocade! It not only was thick and hard to manage, it also raveled like crazy and liked to magically grow and shrink on me. I had a rather big amount of this material at one time and this was the last of it. For that, I am thankful. It did make a cute dress though!

This is also available in the shop. Now to turn my thoughts to the striped 1860's dress. Although now I kinda want to have a reason to make a hobbit dress for me. That can wait though. No more movies coming out. :( Boo. Although I'd definitely watch a mini series based on the residents of Hobbiton if anyone ever decided to make one. 

Love,
Sarah

Sunday, September 6, 2015

1810's Dress! All Done!

Finished it yesterday!

Super pleased with how it came out. I've had the material awhile and it felt good to use it up. Although the actual print is red and white the overall affect is a pleasant plummy pink. 

I really like the way the trim worked out. It wasn't very difficult, either so I may utilize this more in the future. For some reason I always thought this type of trim would be too time consuming. I cheated and used my sewing machine to sew in the cords, but its not noticeable with the fabric ruched over the cording. 

To make the trim, I tore strips of fabric 1.5x the length of the area to be trimmed. I pressed down a seam allowance towards the wrong side and inserted a cord in the fold, and stitched close to the fold. Then it was a simple matter of drawing the fabric up on the cording to the right length. The trim is sewn to the dress by hand with uneven running stitches. 

The skirt is fairly narrow, made of just two widths of 45" fabric. I always forget how little the skirts were in this period of history, especially compared to the over-the-hoop skirts of the 1860's! In one of my books about New Salem (c. 1830's-ish with the area settled in the few decades prior) a contemporary observer wrote that the skirts worn by girls and ladies were so narrow they could not jump across a creek. I will need to look up that reference for the exact phrasing. I found it an odd statement until I realized how narrow the skirts really were, and yes, it would be necessary to draw up the skirts with the hands to jump across a creek. (not that I've ever tried it, but one can use ones imagination. ;) ) 

The very low V neckline would be filled in with a chemisette or kerchief. 

It's available in my shop and now I need to find a use for the remaining yardage I have of this particular fabric. It may make a nice childs dress. We'll see. On to the next project. 

Love,
Sarah

Friday, September 4, 2015

Sewing a Regency Gown

The week has flown by and I am shocked to realize that yes, it is Friday already. The week has been full of school meetings, doctor appointments, mowing the grass, work and the business of everyday life. This week I have been sewing up a new dress for the shop and am very close to finishing it. That is my project for this afternoon. 

This style of dress is transitioning from the columnar styles of earlier years into the fussier gowns of the 1820's. I made the bodice a low V crossover with ruched trim and the sleeves are quite full and long. The skirt is A line in shape and is decorated at the hem with a wide
 ruched band of fabric, and the bodice closes at the back. 

I like this style quite a lot. This particular one always brings me back to my very early forays into historic clothing. Even before I was introduced to Civil War reenacting back in 1998, I fell in love with Lincolns New Salem Historic Site when, shortly after our move from the east coast, my dad took all of us there for a 4th of July. Over the years I went back many times and took the volunteer course, which immersed me deeply into the history of that particular time and place and gave many clues as the attire of the citizens of the town. Which were, mostly, similar in style to the dress I'm making now. 

Ah! Fond memories. New Salem will always be dear to me and this style of dress will be my particular favorite. 

I truly appreciate the effort of historians and volunteers to maintain historic sites like these. Having just heard (yet again) that because of the dismal state of the Illinois budget that most museums are due to close I am half sad, half furious. Mostly resentful of the carelessness that the state has exhibited in the distribution of its monies that has resulted in the closure of many state historic sites over the years. I wish there was something I could do to help keep these places open! I feel pretty helpless and that feeling fuels my anger at the current state of things.

I dream of the days when I will be more free to do something - mainly volunteer! Now, with six children to raise, my ability to do much beyond taking care of them is limited. But I am happy to realize that while I do have these years with them I can teach them to respect and appreciate the unique history of areas they know and love and perhaps instill in them a desire to keep that flame burning when they are older. 

 And for no reason at all, here's some silly pictures of my little girlie. She is so sweet! Oh little baby girl, there aren't enough minutes in the coming years to tell you all I want to tell you and to show you all I want you to know. 


May you all have a very joyous holiday weekend!

Love,
Sarah

Monday, August 31, 2015

Corset Pictures

I got a chance to try everything on today and so far, so good. I can see now a few issues with the corset but it's nothing to get too upset over. Mainly the bust is a bit too tight but since I'm still breastfeeding I think that once the baby is weaned the corset will fit better. As any nursing mom can attest to, bust size is a variable thing from day to day, hour to hour and even minute to minute! ;)

Chemise fits well as does the drawers. The cording in the corset looks cool, but otherwise I don't think it changes the fit very much. It definitely makes the corset feel more firm but doesn't contribute to shaping. Of course, I expected that. 

The back has a pretty good gap. Not totally even but I can work on that more when I have more time to properly dress myself. With the layers of drawers and chemise under it, the hip visually looks better. 

I bought some hair to make a hairpiece. There was quite a lot of it. . .I'm still not sure how to style it exactly, but the match is nearly perfect! 

A closer detail of the corset. This corset is darned hard to photograph since it is such a light color. 

And so, that is that. On to the dress, next, I suppose. And a regency corset, because that is perhaps even more important than a dress. At least, it is equally important!

September is tomorrow. My favorite month of the year; so passes summer. 

Love,
Sarah

Sunday, August 30, 2015

Sunday Sewing

My jolly little boy and I had a peanut butter and jelly picnic and while he rejoiced in plucking clover blossoms and finding interesting sticks and rocks I finished up a little sewing and we enjoyed the beautiful afternoon together. Can I just say how awesome this August has been?! Lovely days with nights just warm enough to leave the windows open while being cool enough to snuggle under several blankets. It has been like having an early autumn. I have not missed the muggy smothering heat of past summers one bit. Although, my tomato plants died prematurely and bore very little fruit. Sad.

So what did I finish this week? Well, my chemise and yes, YES, I DID finish my drawers! Haha, not too much to get excited about but yeah - go me! Once I put new steels into my hooped petticoat, I will be all set to start a dress. 

The last time I made new drawers my son Judah was a baby. That's like, eight years ago. I was long overdue for a new pair. I had a better idea this time of what I wanted them to look like and how I wanted them to fit (my last pairs were quite long, and the leg rather slim. They worked, but didn't look quite right).

I drew inspiration for my drawers from these two original pairs from the Met Museum: 


The first pair most closely represent the loose, baggy, shorter fit I wanted. I didn't have any pretty lace to put on the hem, but I did make a scalloped edge ruffle for each leg. And a few tiny tucks. 


Like most drawers of this period (and at this time, drawers were still optional. I like them because they prevent thigh chafe, which is a highly uncomfortable and debilitating condition) the center seam is left open. I finished the edges with a facing and the two sides are overlapped at the waist to provide modesty when worn. The basic practicality of this design is to provide convenience when using the bathroom.

They close at the back with two buttons. 

The rear is quite baggy and loose, and longer than the front. 

I did try these on and the fit is exactly what I want, so I'm happy!! This is the fabric I plan to use for my dress. 

I really do love this fabric. It is a pretty, almost neutral pink with bold stripes. The stripes really pop yet the overall effect isn't very obnoxiously loud. I don't have a lot of yardage but there is enough to make a decent work dress worn with small hoops and it can be dressed up with simple accessories for more formal occasions, like a church service. I'm excited to make it! 

Love,
Sarah

Wednesday, August 26, 2015

1860's Chemise

I started sewing my chemise together last night and before I knew it I was almost done! I finished off the little bit I had left to do today and took some pictures. It was a quick and simple project but it left me feeling happy.

This chemise is really basic in construction. Many chemises of this era had underarm gussets but raglan-style sleeves are also an option. I went with that for this one, using the original chemise pictured below as inspiration:
Original chemise from eBay
I cut two one yard length panels from my fabric for the front and back. I cut a slight scoop for the neckline and slanted edges to attach the sleeves. The sleeves were pieced since I was using a rather small bit of material and didn't want to cut into new yardage, but the piecing isn't terribly noticeable. Plus, piecing is period. ;) The neck band and sleeve bands are just straight grain strips of fabric. 

This was my first chemise ever with puffed sleeves. I don't like puff sleeves since I've always been kind of self conscious about my arms and I feel like puffs just add bulk where I don't necessarily want it. But it's a very common feature of chemises of this era and since the original I was taking inspiration from had puffed sleeves I decided to try them this time.

Mrs. Clarks free chemise pattern is really similar to mine (and in fact is the pattern I used when I first started out!) I used that basic construction method but added a facing to the seams between the chemise and sleeves as per the original chemise pictured above. This facing makes a lot of sense, since that area will have the most friction and will wear out the fastest. The facing strengthens that area and helps keep it intact for a lot longer!
Inside the sleeve you can see the facing stitched down.
Here is an outside view of the sleeve and the facing: 

I added a bit of vintage lace to the neckline and sleeves. I've had it for a while and it seemed to be just the thing to dress up an otherwise very plain garment. I'm not sure if the lace pattern is totally period correct but I'm happy with it!

I mostly sewed it on the machine. The little bit of hand finishing I had to do was slip stitching the inside bands down over the seam allowance. 


Love,
Sarah

Tuesday, August 25, 2015

How Should An 1860's Corset Fit

Well, I finally got corset strings. I ended up finding some 100% strong cotton cord in, of all places, the jewelry section at Jo Anns. It's a little bulkier than what I'd like (kinda the same thickness as shoelaces, which, I admit with shame, I have used in the past) but it will work for now and saves me the cost of shipping. And so, I tried on my corset!

Excuse the truly horrible picture. I promise I'll get nice ones when my other undermost garments are done! I tried it on over a thin t shirt and a skirt since my chemise isn't done yet. (But it's cut out. And ready to be sewn.) It fits a bit differently than I expected. Last time I made this corset it fit quite well all over. It still fits well through the waist and bust but the hips for some reason came out very loose. Since two more babies have made their appearance since my last version of this corset I was not expecting this slightly odd predicament. If anything I expected the corset to fit a big snugger. Now I gotta decide if I ought to fix this problem or live with it.

So, how did corsets fit in the 1860's? Were the hips loose? Did they skim the body? Of course, hips that are fit too tightly are not ideal, since that kind of fitting can force the corset to shift upwards when the wearer is seated.

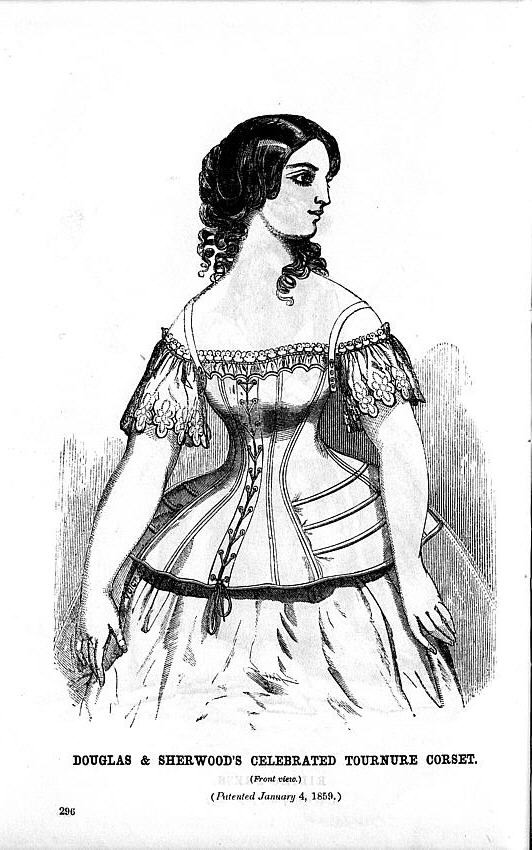
I found this 1859 image from the Hope Greenberg Website that shows a corset that is undoubtedly loose over the hips.
This image depicts a corset from 1862. This was pinned to Iconographique's board on pinterest and I do not have an original reference to link it back to.

It shows a corset very flared at the hips and the shape is very similar to mine. However, without it being illustrated on a body it is impossible to know exactly how this was meant to fit. 

The following illustration can be found, along with others, at Costume Fashion History. It shows a very flared hip, that appears loose if one looks at the shadow the edge seems to cast on the skirts. 

However, these are illustrations of corsets on an ideal figure of the time - not a true representation, per se, of how corsets fit a real, live woman of the era. 

What little time I've had to search for images of real women wearing corsets has turned up nothing. And not terribly surprisingly - it likely was not common that women would have posed for a photograph in such a state of undress. Even "adult" images from this period don't turn up any good visual clues as to the fit of a corset. Darn.

I don't particularly want to have to take in my corset. It fits well every where else. I guess the only way to know if it works for me is to wear it around the house for a while. The only problem I can foresee is chafing, if the hips are loose enough to cause friction between the skin and the chemise. Otherwise, the hips will be unseen anyway beneath the layers of petticoats, skirts and a cage. 


Tuesday, August 18, 2015

New Corset is Finished!

Yesterday I finally finished this thing. It is definitely the longest any corset has ever taken to make. But I was able to work on it just a little at a time and think about my next step before moving on, so that was kind of a new experience since in the past I've been more of a speed sewer. I'm really happy with how it came out, except - I haven't been able to try it on yet!

I need to get corset laces. In the past I've used shoelaces or twill tape or cording-of-uncertain-fiber-content from Jo Anns. For this one I really want to have the proper cotton laces. I haven't gotten around to ordering them yet so I need to do that. In the meantime I need to make a new chemise and drawers. Maybe I'll get that done this week but I don't want to be too ambitious. 

I ended up doing minimal cording on the back. Just a bit around the hip gusset and then some slanty lines across the middle of the back. To be honest I became a bit bored with it and was eager to hurry up and get these done so I can start on my next corset, which will be early 19th century corded stays. I watched many episodes of M*A*S*H*, Mr. Belvedere and Three's Company while doing all the handwork, including the eyelets. 

This last photo is of the inside. It looks pretty much the same as the outside, except for the where the lining is stitched to the gussets. 

Thought about adding lace to the top edge but decided nah. I like the way they are plain. I hope (hope) to be able to participate the Historical Sew Monthly for next month which I believe is themed "Brown". I have some fabric for a simple working appropriate dress that I'd like to make to wear over this corset! (Pink with brown stripes. It delights me.) 

OK. Off to order corset strings. 

Love,
Sarah