Tuesday, July 7, 2015

18th Century Shortgown

I finally finished the shortgown I was working on over the weekend. It was a lot of handsewing compared to what I am accustomed to but I'm pleased with how it came out. It is a very simple but clever garment.

The shape is very simple. It's basically a T-shape with the sleeves cut as one with (or pieced on to) the body. There is no shoulder seam and the skirts are cut with a flare or have pieced on gores to add width to the hem. 
eeep! sorry my toes made an appearance in the photo. 

It is clever in how it is fit to the body with pleating at the back. This can fit nicely to the body and leaves the shoulders and arms with a lot of room for movement, which is ideal for working impressions. Love!
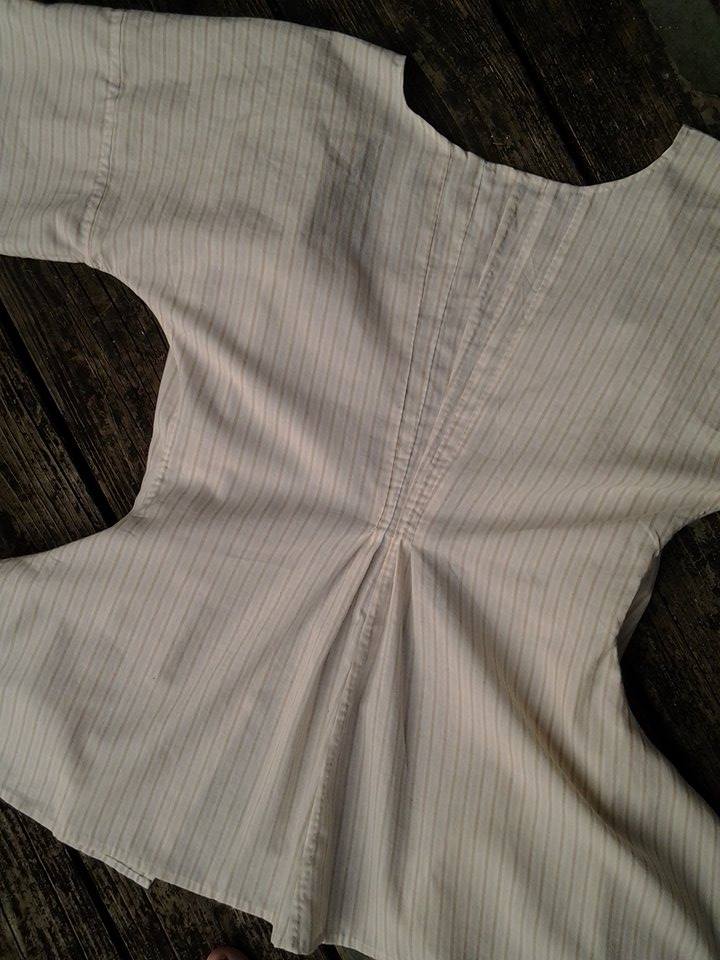
I made this one in striped cotton. It is unlined so all the seams had to be finished by hand, which is why it took me longer than I thought it would to finish it. It has no closures but can fasten with pins. Or, I could have added ties to it. Pins are easier though. ;) 

From what I understand these garments were worn as casual wear for "at home" times by ladies or as a practical alternative to the more fitted gown for ladies who had to perform physical labor. Since I ultimately compare everything to the 1860's, this strikes me as a early version of the 60's sacque and petticoat type of outfit, which were also more loosely fitted and worn for at home or working scenarios. 

This one is available in my etsy shop. My dressform shape isn't right for the 18th century period but here is a general idea of how it will look when worn: 
   

Thursday, June 25, 2015

Renn Bodice from Sense and Sensibility Romantic Pattern

I am a bit behind in chronicling my sewing projects, but here is a recent one I finished last week. It is now on its way to its new home and hopefully will see a lot of use in the future!

So, I made a Renn Faire Bodice. At every Faire I go to I see these bodices, in a wide range of colors, fabrics and trims. Generally the fit is similar. Snug fitting, with the cut of the bodice helping to lift and support the bust. I have seen bodices with princess seams, darted-to-fit and, like mine here, cut as shaped pieces that are only seamed at the shoulders and sides. The garment itself is not really representative of any particular era of history, although I suppose it resembles the fit of an Elizabethan or Tudor style kirtle bodice. Paired with a chemise and petticoat it gives a very pretty look and would also work well for a hobbit costume.

I decided to work with an actual commercial pattern as my base for this bodice. Since Sense and Sensibility Patterns  allows use of their products for home seamstresses who make garments to sell, I took the Romantic Era Dress pattern and modified it to become a bodice pattern.

This particular bodice was cut in the size 16, using the front, back and side back pieces. I eliminated the darts in the front bodice pieces using the technique described here and then cut out each pattern piece in my fabrics - a brown floral brocade for the outer layer and a sturdy green cotton twill for the lining. I cut down the neckline of the original pattern a bit as well as the armscyes.

I sewed up the layers using the seaming technique I used for my mid-19th century shaped seam corset and finished the front opening by turning the seam allowances in towards each other and sewing close to the fold. I sewed a channel for a bone at each side seam and at the center front openings.

After inserting the bones, I put in two piece grommets for lacing and bound the armscyes, waist and neckline with the same green cotton twill that I used for the lining. A simple green twill ribbon works nicely for lacing.

And so we have a Renn Faire Bodice!

I liked how it came out so much that I wanted to keep it for myself. However, it is unfortunately (fortunately?) too big for me so I could not. I do, however, have more of the same fabric left...perhaps I can sew one for next years Olde English Faire.

Tuesday, June 16, 2015

Regency Roundgown - Finished Dress

Here are some photos of the finished gown! It was completed by inserting the waistline drawstring and hemming the skirt.


While I was finishing it I also finished reading Mansfield Park and I was saddened. I used to dislike that book more than any of Austen's others but now it is very close to being my favorite Austen novel. Odd??? I have no idea what changed my mind. The movie adaptions are still bad, though. In my opinion.


I took a few photos of me wearing it. Even without being custom fit and without stays, it still works pretty well! 


The gown is now is for sale in my etsy shop. I have started a new set of stays for myself although I am not sure when they will be completed. Now to finish my Benji-Boys 1860's unders. He has been sick this past week, poor fellow, and was more in need of snuggles and sleep than anything. Thankfully he has made a full recovery and is back to his cheerful, exploratory old self. 

Saturday, June 13, 2015

A Regency Roundgown - Sleeves and Skirt

It has been a rather wet and humid week and I was able to quickly get the sleeves done, in the course of about an afternoon. Generally sleeves are my least favorite parts of a garment to sew - yet for some reason the most satisfying.

Now, here I must share the extremely important information to ALWAYS SAVE YOUR SLEEVE PATTERNS. Sleeves are hard, but its easier when you have a base pattern to start from. I generally trace off my finished bodice mock ups to save as a pattern for future gowns but for some reason fail to trace and save the sleeves. Do not make my mistakes; learn from them. Save the sleeves.

So. This sleeve is a super basic elbow length sleeve. Its cut with an S shaped head, so the seam runs down the back of the arm. Little pleats take in the excess fullness of the sleeve head and are set at the back of the arm. This way of cutting, coupled with a deeply cut back armscye, gives maximum flexibility to arm movement.

And all that I need to do is sew up that seam, finish the seam, hem the bottom and thats it.

The finished sleeves are pinned into the armscyes. Now, generally you fit the sleeves as you go and then sew them in after you perfect their hang on your own arms. This dress is from a pattern I draped to fit my dressform, not me, so I didn't fit the sleeves again after the initial draping.
And an inside view: 
If desired, the armscye seam can be finished. The tidiest looking (well, in my opinion anyway) is binding the armscyes. 
And here is what it looks like so far!
The skirt is extremely easy - just two rectangles seamed together, with a slit cut and hemmed at center front for the front opening. 
I cut this skirt with a slight train at the back (very slight) so the top edge of the rectangle skirt was cut higher in the back, tapering down at the sides to the front. This enables the hem to be sewn easily (no curves to hem) and still gives the extra length at the back to train prettily. 

To sew the skirt to the bodice, I pleated up fabric at the back in deep pleats. leaving the skirt plain at the side and front. 
After pinning the skirt to the bodice, I sewed it together. Woo ya. The seam between the bodice and skirt at the front and sides will be sewn to become the drawstring channel for the waistline. The seam allowance at the back (where the skirt is pleated) will be covered in self fabric binding. Here's a back view: 
And front: 


Thursday, June 11, 2015

A Regency Roundgown - Bodice

Last fall I draped a new pattern for a basic regency drawstring bodice and wanted to experiment with it to see what kinds of garments I could make from one basic pattern. I made a short jacket/bodice to wear over a gown or a petticoat, an open robe and now I'm finally making a round gown. So far I have made the bodice and cut the sleeves. This type of gown has a skirt that is attached all the way around the waist (thus making it a "round" gown) and the opening is at the front. The bodice has a fitted lining that pins shut at the bust and the outer layer is gathered up on drawstrings over it. The skirt has a center front slit that is hidden when the drawstring waistline is gathered up. 

First, I cut the back and side pieces from my dress fabric. I also cut a layer of cotton for lining: 
They were sewn together with the lining and outer fabric treated as one. 
I usually sew the fitted lining, or flaps, as a single layer hemmed all around the edges. For these, though, I cut two layers and sewed them together and turned them right sides out for a sturdier flap, since I want to see if this will support the bosom better if worn without stays. 
And here is the lining piece laid over the outer bodice, matching armscyes. I've turned under a narrow hem at the neckline of the outer bodice for the neckline drawstring. 
To finish the seams I turned them under and felled them down by hand. 
The neckline casing for the drawstring was stitched down, the front edges of the bodice hemmed and the strings run through: 
Then the front and back were sewn together at the shoulder and sides and voila! A bodice. :) 
Okay, I will need you to excuse the sad state of my dressform. After being used by me for a while she was lent out to several other people and was returned in a rather disheveled state. The inner parts wore out, snapped off and gave up and I was on the verge of tossing her into the garbage when I decided to try one last time to make her work for me. She got a new wooden pole and a Christmas tree stand to keep her upright and I taped the body together with white duct tape. So, she lives again. For how long? Who knows. But for now she works well enough for my purposes. 
Bodice lining pinned shut, and the outer bodice gathered up over it. 
Next up: sleeves. 

I'm looking forward to seeing this dress finished. I've been re reading Mansfield Park and this simple style of dress and informal cotton print is one I can imagine Fanny wearing.  

Friday, May 29, 2015

Pleated Frills

This week I got into an 18th century fever of passion and pulled out my costuming books and fabrics for new stays. The last ones I made were a tad long waisted and not as comfortable after a few hours of wear as they might have been.

They aren't the biggest priority at the moment (I need new regency stays far more) so I spent an afternoon patterning a cap that can be used for this period through the regency period as well.

This is a basic enough cap. It has a shaped band, a poufy crown with a drawstring neckline and a frill. I decided to sew these mostly by hand so spent a few pleasant sunshiney hours stitching on the big bed in my room with the baby napping at my side.

It was nice to practice hand sewing again. I have used the machine quite a lot lately but I do not have that unique and intimate connection with a machined project that is present when something is hand sewn.

My favorite part was making the pleated frill. The linen creased so well just with finger pressing and I liked seeing it take shape as the pleats were pinned. I cut the frill to have a gradually decreasing width towards the ears with the widest point over the forehead.

Scraps of silk worked for decoration. I made the other cap with greenish-gold colored silk trim.

Both of these are available in my etsy shop. I ordered some sheer white cotton so my next ones will be finer, with lace edging.

Love,
Sarah

Sunday, January 18, 2015

1860's Corded Bonnet

Well, I haven't made my 1970's knit dress yet. I want to. I need to. The baby bump is making my normal clothes fit awkwardly and nothing seems quite so relaxing as the thought of draping myself in yards of soft comfy knit. But, well, when it comes down to it sewing for profit wins over sewing for personal desires and so, I made a new sunbonnet instead.


This sunbonnet is based on the below original, which I've wanted to copy for quite a few years now. For some reason I thought the vandyked edge on the brim would be super hard. It wasn't. It went together pretty fast, although I did use my machine for most parts.


It is a bit different from the standard "on the square" bonnets I've made before. This one has a flared brim which frames the face prettily without giving it a narrowing effect. It has a more fitted crown. The curtain is still rectangular. I gathered it by hand and whipped it to the inside of the finished brim and bottom crown edges.


It needs a little more work to be more like the original. A shorter curtain, a more tailored crown (mine came out a bit too poufy) and another set of 3 rows of cording in the brim.


It might be a nice addition to use a drawstring to draw up the fullness at the back neck. It would be adjustably sized that way and it makes ironing easier. I might try that on the next one.


The brim is cut in two identical pieces, sewn right sides together along the vandyked and short edges, turned and pressed. The cording is put in as 3 rows along the short and vandyked edge, then 2 more sets of 3 rows evenly spaced. (Just over an inch, in my case). Like I said, the next one will use another set of cords to more closely resemble the original.


This bonnet sold right away through a Facebook group but I was truly astounded by the interest in this style. I'll be making more and they will be available in my etsy shop for $45 pp once I refine the pattern.

Love,
Sarah

Wednesday, January 7, 2015

Hoods

Not much lately but hoods! I did have the luxury of going out today, without the children, to fabric shop. I bought a length of knit to make a dress from a 1976 pattern Anne unearthed for me from a dusty cardboard box stuffed on the bottom shelf of my book-turned-fabric-case.

A hood in silver grey with blue silk trim:


And one in quilted plaid wool:


I am tiring of hood-making. My thoughts are turned springward.

Its 2015! How did that happen?

Love,
Sarah